Introduction
Knowing how LinkedIn is notorious for blocking automation when scraping their data, how do you ensure success in obtaining those highly sought-after professional profile data for your business?
If that is a major pain point you wish to solve, then you are in for a treat.
Crawlbase is fully aware of the wealth of opportunities that LinkedIn data crawling brings. In fact, being a pioneer in internet crawling, Crawlbase specializes in acquiring LinkedIn data and boasts a unique algorithm that ensures a successful scraping experience, specifically tailored for LinkedIn data.
Understanding the Project Scope
This guide will demonstrate how to construct a resilient callback server using Flask. This server will act as the webhook for the Crawlbase Crawler, facilitating asynchronous retrieval of LinkedIn user profiles. The focus will be on parsing the ‘experience’ section and saving it in a MySQL database. This process optimizes the collection of essential data that can be applied to:
- Talent Sourcing and Recruitment
- HR and Staff Development
- Market Intelligence and Analysis
- Predictive Data Analysis
- AI and Machine Learning Algorithms
It’s vital to respect LinkedIn’s terms of use and privacy guidelines when handling such data. Crawlbase strictly forbids extracting private data from LinkedIn or any other site. The example here is based solely on publicly accessible data and is intended for educational purposes.
Let’s begin.
Table of Contents:
Part I: Preparing the Environment
a. Creating Crawlbase Account and Activating LinkedIn Crawling
b. Setting Up MySQL Database
c. File and Directory Structure
d. Building a Virtual Environment in Python
e. How to get a list of LinkedIn profiles
Part II: Writing Scripts for the Project
a. Create an ORM definition using SQLAlchemy to Interact with your Database
b. Script to Send Requests to the Crawlbase Crawler
c. Creating a Flask Callback Server
d. Script to Retrieve Crawled Data and Store in Database
Part III: Executing the Scripts
a. Start a Local Tunneling Service Using Ngrok
b. Run the Callback Server
c. Testing the Callback Server
d. Configuring the Crawlbase Crawler with your Callback URL
e. Run the Processor
f. Initiate Crawling
Part IV: Crawler Monitoring
Part VI: Conclusion
Part VI: Frequently Asked Questions
Part I: Preparing the Environment
A. Creating Crawlbase Account and Activating LinkedIn Crawling
- Begin by visiting the Crawlbase website and sign up for an account.
- Go to the LinkedIn agreement page to read and accept the terms.
- Add your billing details by going to the billing information settings.
B. Setting Up MySQL Database
We will be using MySQL as it is a popular relational database management system that is widely used for various applications. In this example I will be using MySQL version 8. If you don’t have this installed yet on your machine, please head over to the official installation manual of MySQL.
After installing, open MySQL command line client. You will be prompted to enter the password for the MySQL root user. After entering the password, you will be in the MySQL command-line interface. Then, you can execute the following command lines.
- Create a new user
1 | CREATE USER 'linkedincrawler'@'localhost' IDENTIFIED BY 'linked1nS3cret'; |
The code creates a new MySQL user named linkedincrawler with the password linked1nS3cret, restricted to connecting from the same machine (localhost).
- Create a database
1 | CREATE DATABASE linkedin_crawler_db; |
This database will be an empty container that can store tables, data, and other objects.
- Grant permission
1 | GRANT ALL PRIVILEGES ON linkedin_crawler_db.* TO 'linkedincrawler'@'localhost'; |
This will grant our user full privileges and permissions to the newly created database.
- Set current database
1 | USE linkedin_crawler_db; |
This will select our database and direct all our instructions to it.
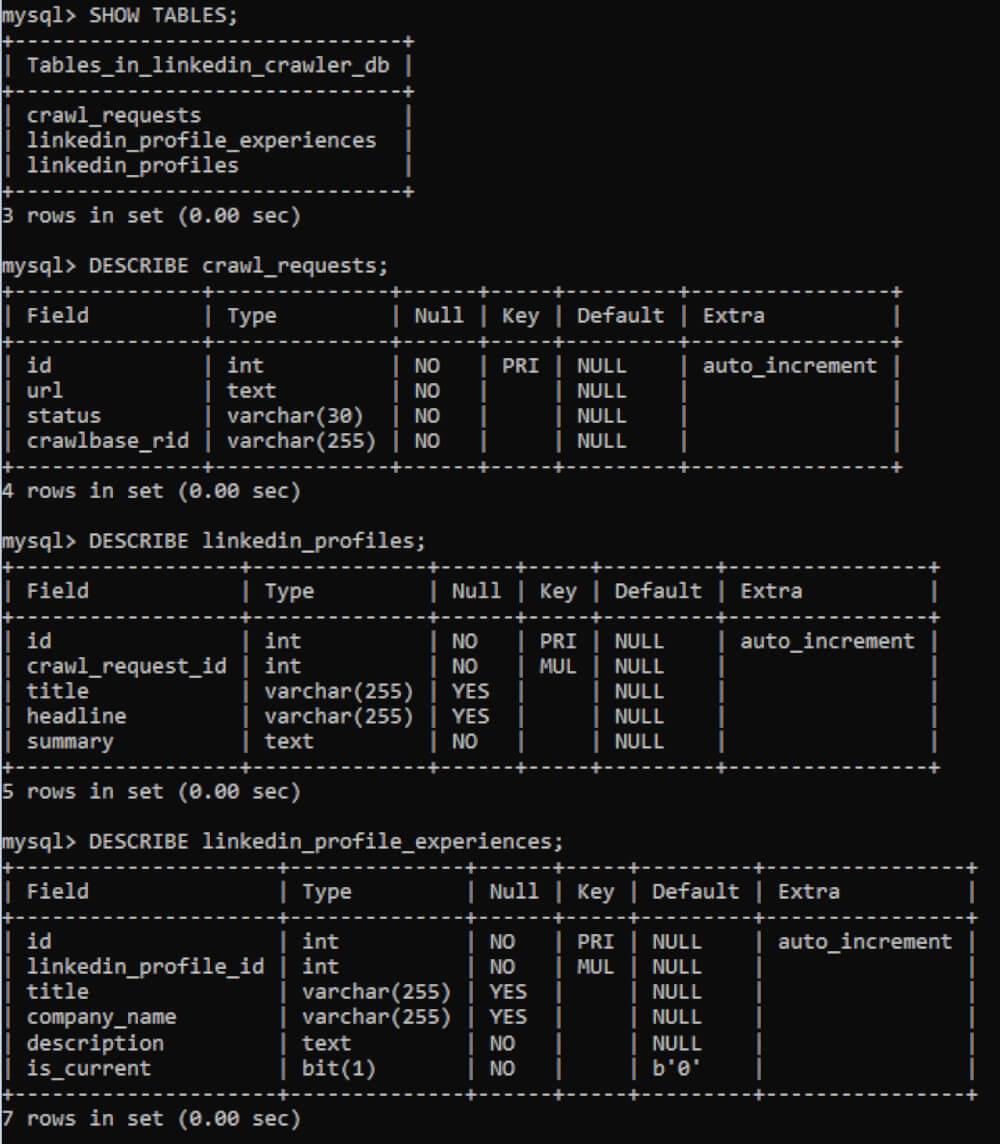
- Now, let’s create three tables within the currently selected database:
crawl_requests,linkedin_profiles, andlinkedin_profile_experiences.
The crawl_requests will be the main table that will serve as a mechanism to track the whole asynchronous crawling process.
In this table, we will have 3 columns: url, status, crawlbase_rid.
The status column can have one of these three values - waiting, receiving, and processed. The purpose of these statuses will be elaborated later on.
1 | CREATE TABLE IF NOT EXISTS `crawl_requests` ( |
Then we create a database indexes for performance in our query.
1 | CREATE INDEX `idx_crawl_requests_status` ON `crawl_requests` (`status`); |
For the last 2 tables, It will allow you to store the structured information on the crawled LinkedIn profiles and their associated details.
1 | CREATE TABLE IF NOT EXISTS `linkedin_profiles` ( |
To view the tables you’ve created in your MySQL database, use SQL queries in the MySQL command-line interface or a MySQL client tool.
C. File and Directory Structure
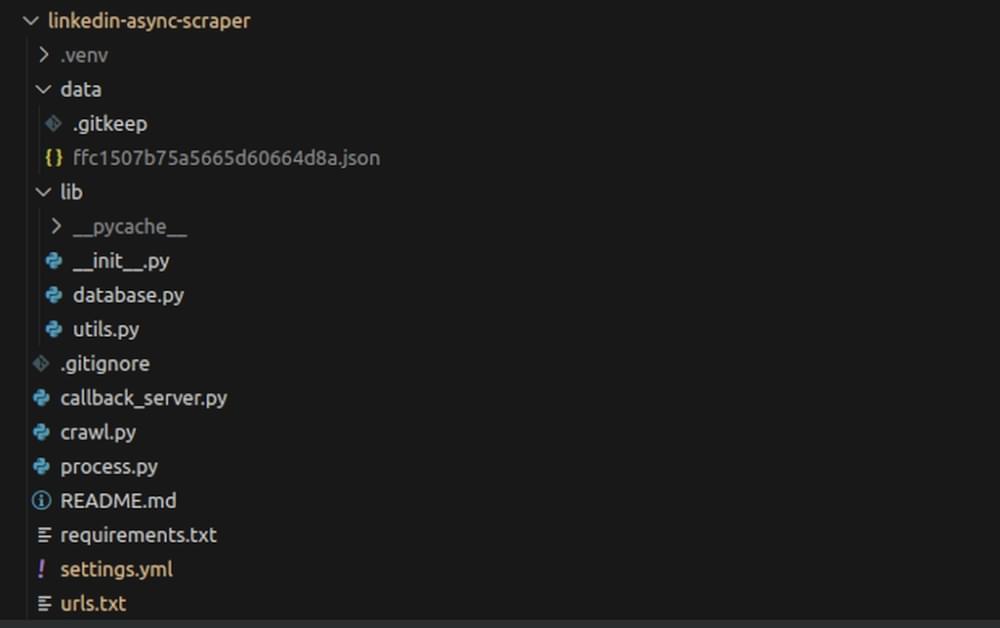
It is important to organize your files when setting up an environment in Python. Make sure that each of them will be saved under the same project directory as shown below:
D. Building a Virtual Environment in Python
A virtual environment is an isolated space where you can install Python packages without affecting the system-wide Python installation. It’s useful to manage dependencies for different projects.
In this project we will be using Python 3. Make sure to download and install the appropriate version.
Open Git Bash or terminal to execute the following command.
1 | PROJECT_FOLDER$ python3 -m venv .venv |
Once you’ve created the virtual environment, you need to activate it.
1 | PROJECT_FOLDER$ . .venv/bin/activate |
Create a text file within your project folder and save it as PROJECT_FOLDER/requirements.txt. This file should contain the following Python packages that our project will depend on.
1 | Flask |
Install the dependencies using the pip command.
1 | PROJECT_FOLDER$ pip install -r requirements.txt |
In the same directory, create a file named PROJECT_FOLDER/settings.yml which will serve as the placeholder for your Crawlbase (TCP) token and Crawler name.
1 | token: <<YOUR_TOKEN>> |
E. How to get a list of LinkedIn Profiles
To get a list of LinkedIn profile URLs, you typically need to gather these URLs from different sources, such as search results, connections, or public profiles. Here are a few ways you can acquire LinkedIn profile URLs:
- Manually Collecting:
- You can manually visit LinkedIn profiles and copy the URLs from the address bar of your web browser. This method is suitable for a small number of profiles.
- LinkedIn Search Results:
- Use LinkedIn’s search feature to find profiles based on specific criteria (e.g., job title, location, industry).
- Copy the URLs of the profiles listed in the search results.
- Connections’ Profiles:
- If you’re connected with someone on LinkedIn, you can visit their connections list and extract profile URLs from there.
- Third-party API:
- You can build a separate scraper utilizing Crawlbase to automate the collection of LinkedIn URLs. We may cover this in an article in the future, so please watch out.
For the purpose of this article, we have provided a list of LinkedIn URLs to be scraped. By default, we have configured the text file with the top 5 most followed personalities on LinkedIn.
This file is located in PROJECT_FOLDER/urls.txt.
Note: that each line corresponds to a valid URL. If you have readily available URLs, you may edit this text file and add them to the list.
Part II: Writing Scripts for the Project
A. Create an ORM definition using SQLAlchemy to Interact with your Database
Now, we have to build a script for working with LinkedIn-related data in a MySQL database. This script will start by importing necessary modules from SQLAlchemy and the typing module for type hints.
For demonstration purposes, we’ll save this script in PROJECT_FOLDER/lib/database.py
1 | from typing import List |
This code provides a function to create a session for database interaction. Note that the script we’ll provide assumes you have the necessary libraries installed and a MySQL server running with the specified connection details.
B. Script to Send Requests to the Crawlbase Crawler
The Crawlbase Crawler operates asynchronously within a push-pull system that utilizes callback URLs. When you send requests to the Crawler, it assigns a unique RID to each request. The Crawler internally performs the crawling until a successful response is obtained. Subsequently, this response is transmitted back to your designated webhook, enabling you to process and subsequently store the data within your database.
For more details, you may check the complete documentation of the Crawlbase Crawler.
The script begins by importing necessary modules, including requests for making HTTP requests, urllib.parse for URL encoding, json for handling JSON data, and JSONDecodeError for handling JSON decoding errors.
For demonstration purposes, we’ll save this script in PROJECT_FOLDER/crawl.py.
1 | import requests |
The code will read the URLs from the PROJECT_FOLDER/urls.txt and sends each URL to the Crawlbase API for crawling, which will then responds with a Request ID e.g. {”rid”: 12341234}. The code will create a new row entry to store the RID in our crawl_requests table with a status of waiting.
Please note that we’ll have to insert the corresponding crawlbase_token and crawlbase_crawler name in this script which we will tackle in the guide later on.
C. Creating a Flask Callback Server
Flask is a micro web framework written in Python that we will use to create the callback server.
Ensure that your callback is equipped to perform base64 decoding and gzip decompression. This is essential because the Crawler engine will transmit the data to your callback endpoint using the POST method with gzip compression and base64 encoding.
For demonstration purposes, we’ll save this script in PROJECT_FOLDER/callback_server.py.
1 | import gzip |
This code sets up a Flask app with one route to handle callbacks made from the Crawlbase Crawler. Note that the Crawlbase Crawler puts the RID information in the request header named rid.
In addition, this code will check our crawl_requests table for the same RID with a waiting status, else, the request will be ignored.
It also make sure that the request headers Original-Status and PC-Status are of HTTP 200 OK success status response code.
Once it receives the crawled data from the Crawler, it will be processed (decoded and decompressed) and saved in the data folder and then updates the status of the RID into received.
D. Script to Retrieve Crawled Data and Store in Database
This code takes on the task of regularly monitoring the status of RID in our crawl_requests table. When it detects that the status has been received, it initiates the data processing to populate both the linkedin_profiles and linkedin_profiles_experiences tables. Upon completion, it updates the RID status to processed.
For demonstration purposes, we’ll save this script in PROJECT_FOLDER/process.py.
1 | import json |
Part III: Executing the Scripts
A. Start a Local Tunneling Service Using Ngrok
Ngrok is a tool that creates secure tunnels to localhost, allowing you to expose your locally hosted web application to the internet temporarily.
Create a temporary public URL with Ngrok that will point to your locally hosted app. This will allow us to use our Flask Callback server as a webhook to the Crawlbase Crawler.
1 | $ ngrok http 5000 |
Once executed, get the public URL which we’ll use later on to create our Crawler.
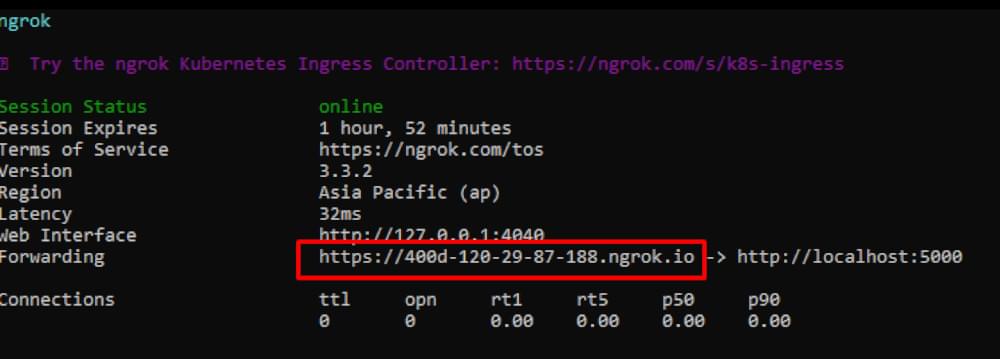
Note: We need to point ngrok to port 5000 as our Flask app callback_server.py will default to the same port.
B. Run the Callback Server
Now that Ngrok has been initialized, we can then run our Callback server that will catch the RIDs and crawled content from Crawlbase.
1 | PROJECT_FOLDER$ python callback_server.py |
Based on our code, this is the complete route that handles the callback:
https://400d-120-29-87-188.ngrok.io/crawlbase_crawler_callback
C. Testing the Callback Server
We have to make sure that the callback server is working as expected and can pass the Crawlbase requirements. To do this, you can execute the following code snippet and observe the outcome:
1 | $ curl -i -X POST 'http://localhost:5000/crawlbase_crawler_callback' -H 'RID: dummyrequest' -H 'Accept: application/json' -H 'Content-Type: gzip/json' -H 'User-Agent: Crawlbase Monitoring Bot 1.0' -H 'Content-Encoding: gzip' --data-binary '"\x1F\x8B\b\x00+\xBA\x05d\x00\x03\xABV*\xCALQ\xB2RJ)\xCD\xCD\xAD,J-,M-.Q\xD2QJ\xCAO\xA9\x04\x8A*\xD5\x02\x00L\x06\xB1\xA7 \x00\x00\x00' --compressed |
This curl command will make a POST request to your callback URL with a custom HTTP header 'HTTP_RID' set to 'test'.
Upon successful execution, you should receive an identical response as presented below:
[app][2023-08-10 17:42:16] Callback server is working
D. Configuring the Crawlbase Crawler with your Callback URL
Now that we have established a working callback server and successfully designed a database, it is time to create a Crawler and integrate our callback URL into Crawlbase.
Log in to your Crawlbase account and navigate to the Create Crawler page. Type in your desired Crawler name and paste the callback URL we’ve created earlier.
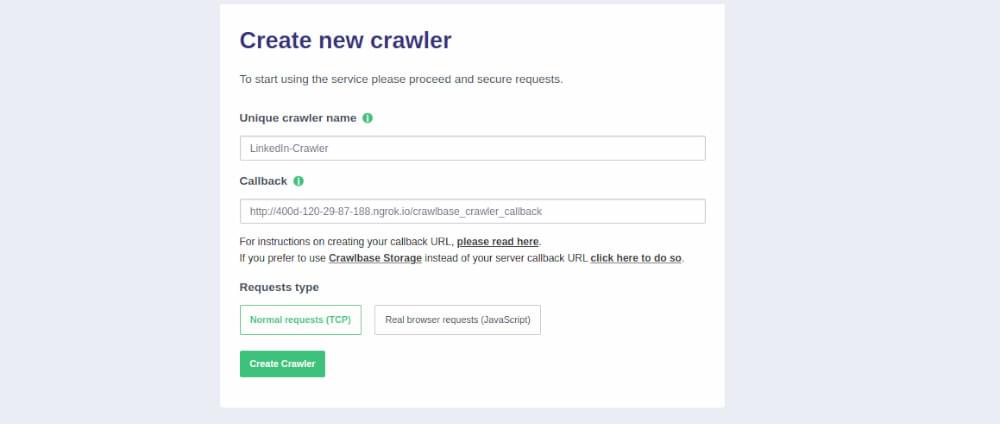
Note: Crawlbase has assigned the Normal request (TCP) Crawler for LinkedIn, so we have to select that option. Even though Normal request is selected, it is worth noting that Crawlbase employs advanced AI bots with algorithms designed to mimic human behavior. Additionally, premium residential proxies are utilized to further enhance the success rate of each crawl.
E. Run the Processor
Open a new console or terminal within the same directory and activate.
1 | PROJECT_FOLDER$ . .venv/bin/activate |
Initiate the script process.py
1 | PROJECT_FOLDER$ python process.py |
This script should continuously run in the background as it frequently checks for the data that will come from the Crawlbase Crawler.
F. Initiate Crawling
Before firing your requests, please ensure that you have set all the correct variables to your scripts. Get your normal request/ TCP token from the Crawlbase account page.
Go to your project’s main directory, open the PROJECT_FOLDER/settings.yml file and add your TCP token value and Crawler name.
1 | token: <<YOUR_TOKEN>> |
Open a new console or terminal within the same directory and activate.
1 | PROJECT_FOLDER$ . .venv/bin/activate |
Initiate the script crawl.py
1 | PROJECT_FOLDER$ python crawl.py |
After sending your request, you should notice that your crawl_requests database will be populated with the URL being crawled, the RID from Crawlbase, and the corresponding status as shown in the screenshot below.

Part IV: Crawler Monitoring
The Crawlbase Crawler is a versatile system that offers useful features including Live Monitoring which will be handy to track the status of the requests from our custom crawler in real-time. To get to the page, simply navigate from your Crawler dashboard and click on the Live Monitor tab.
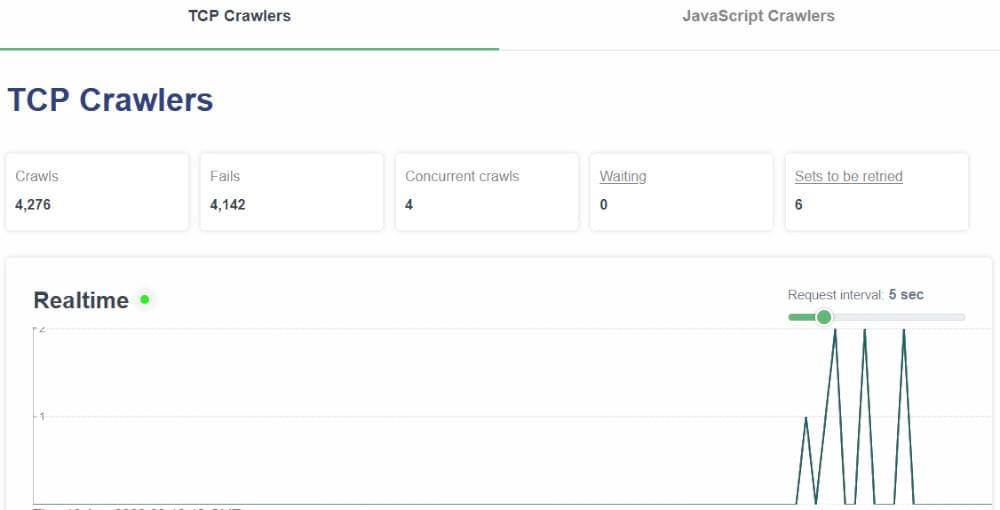
Definition of Terms
Crawls - The total number of successful crawls
Fails - The number of internal crawl failures (Free of charge)
Concurrent crawls - The number of requests being simultaneously crawled at any given time.
Waiting - Requests that are currently in the queue waiting to be crawled.
Sets to be retried - The number of requests that need to be retried. The Crawler will attempt to crawl the target URLs up to 110 retries or until it gets a successful response.
Once the Crawler successfully completes a crawl, it will deliver the data back to your callback server. Therefore, it’s crucial to maintain the server’s availability at all times. Your linkedin_profiles and linkedin_profile_experiences database table should get updated automatically once it receives the scraped data, eliminating the need for manual intervention.
Part V: Conclusion
Here is a simple components flowchart that summarizes our project scope:
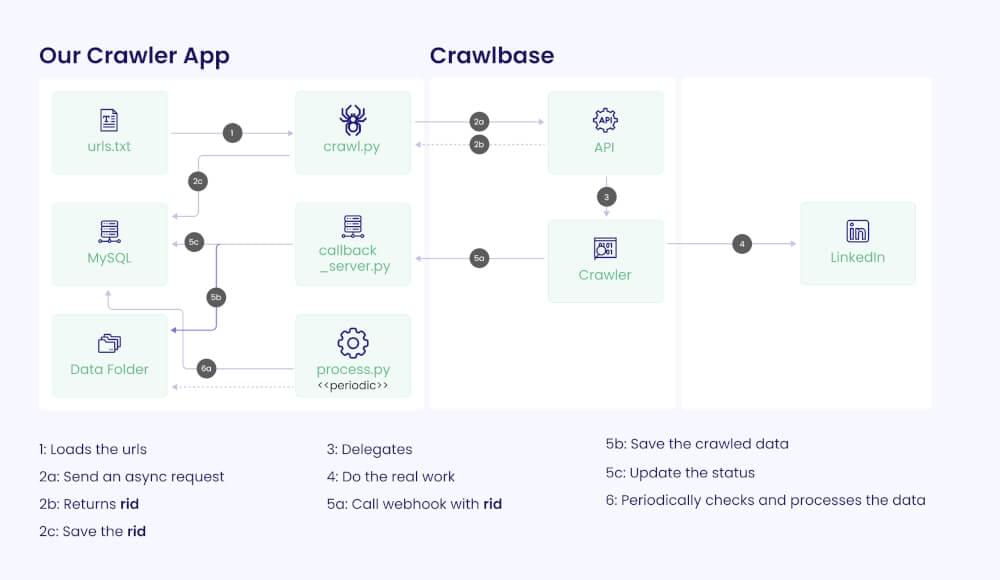
To wrap it all up, this guide has taken you on a journey to construct an efficient and highly scalable LinkedIn Profile Crawler using Crawlbase. Confronting the challenges of scraping data from LinkedIn, this guide provides a strategic solution for obtaining valuable professional profile information.
Crawlbase, a pioneer in web crawling, comes with a specialized algorithm designed for LinkedIn data, ensuring smooth scraping experiences. The project aims to create a Flask callback server that efficiently captures LinkedIn profiles asynchronously, storing them in a MySQL database. It’s important to note that only publicly available data is utilized in accordance with LinkedIn’s terms.
From environment setup and script writing to code execution, this guide covers every crucial step. You’ll seamlessly progress by testing the server, configuring the Crawlbase Crawler, and kickstarting data requests.
Crawler Monitoring offers real-time insights as you move forward, providing enhanced control over the process. Armed with this guide, you’re ready to harness the power of Crawlbase, crafting a dynamic LinkedIn Profile Crawler that fuels your projects with invaluable LinkedIn insights.
Lastly, head over to GitHub if you want to grab the complete code base of this project.
Part VI: Frequently Asked Questions
Q: How do I send additional data to my asynchronous request and retrieve it back in my callback server?
You can pass the callback_headers parameter to your request. For instance, let’s assume we want to append additional data like BATCH-ID and CUSTOMER-ID to each request:
1 | batch_id = 'a-batch-id' |
Then add the encoded_callback_headers to the url parameter in the request.
Example:
1 | crawlbase_api_url = f'https://api.crawlbase.com?token=mynormaltoken&callback=true&crawler=LinkedIn-Crawler&url=https%3A%2F%2Fwww.linkedin.com%2Fin%2Fwilliamhgates%2F&autoparse=true&callback_headers={encoded_callback_headers}' |
You can retrieve those values in our callback server via HTTP request headers. So in our example, BATCH-ID and CUSTOMER-ID will be retrieved as:
1 | batch_id = request.headers.get('BATCH-ID') |
For more information, please visit this part of the Crawlbase documentation.
Q. How do I protect my webhook?
You can safeguard the webhook endpoint using any combination of the following methods:
- Attach a custom header to your request, containing a token that you’ll verify for its presence within the webhook.
- Utilize a URL parameter in your URL, checking for its existence during the webhook request. For instance: yourdomain.com/2340JOiow43djoqe21rjosi?token=1234.
- Restrict acceptance to only POST requests.
- Verify the presence of specific anticipated headers, such as
Pc-Status,Original-Status,rid, etc.
As a side note, we advise against IP whitelisting due to our crawlers potentially originating from various IPs, and these IPs could change without prior notice.
Q. Is scraping LinkedIn data legal?
The legality of web scraping, like scraping LinkedIn data, is complex. In the hiQ Labs v. LinkedIn Corp. case, the Ninth Circuit ruled scraping publicly available data might not violate the Computer Fraud and Abuse Act (CFAA). However, this is specific to that jurisdiction and interpretation of the CFAA. Web scraping’s legality depends on factors like data nature, methods used, agreements, and jurisdiction laws.
Scraping copyrighted content or disregarding terms of use can lead to legal problems. This is why Crawlbase only allows the scraping of publicly available data — data that can be accessed without a login session.
If you need more clarification about how this applies to your situation, seeking advice from a legal professional for accurate guidance is recommended.
Q. What other types of user data can I get from Crawlbase LinkedIn scraper?
The most valuable and common data to scrape from LinkedIn profiles are as follows:
- Name: The user’s full name.
- Headline/Profession: A brief description of the user’s professional role or expertise.
- Number of Connections: The count of connections the user has on LinkedIn.
- Location: The geographic location of the user.
- Cover Image: An optional banner image displayed at the top of the user’s profile.
- Profile Image: The user’s profile picture.
- Profile URL: The unique web address of the user’s LinkedIn profile.
- Position Info: Details about the user’s current and past job positions.
- Education Info: Information about the user’s educational background.
- Experience: A comprehensive overview of the user’s work experience and career history.
- Activities: User-generated posts, articles, and other activities on LinkedIn.
- Qualifications: Additional certifications or qualifications the user has achieved.
- Organizations: Details about organizations the user is associated with.
Q. Why use Flask for webhook?
- Customization: Flask is a Python web framework that allows you to create a highly customizable webhook endpoint. You can define the behavior, authentication, and processing logic according to your specific needs.
- Flexibility: Flask provides you with the flexibility to handle various types of incoming data, such as JSON, form data, or files. This is important when dealing with different types of webhook payloads.
- Integration: Flask callback servers can easily integrate with your existing Python-based applications or services. This makes it convenient to incorporate webhook data into your workflows.
- Authentication and Security: You can implement authentication mechanisms and security measures within your Flask webhook server to ensure that only authorized sources can trigger the server.
- Debugging and Logging: Flask provides tools for debugging and logging, which can be incredibly useful when monitoring the behavior of your webhook server and diagnosing any issues.
- Scaling and Deployment: Flask applications can be deployed to various hosting environments, allowing you to scale your webhook server as needed.
- Community and Resources: Flask has a large and active community, which means you can easily find tutorials, documentation, and third-party packages to help you build and maintain your webhook server.
Q. Why do a more complex asynchronous crawling instead of synchronous?
Synchronous crawling processes tasks in a sequential manner, which can be simpler but slower, especially when waiting is involved. Asynchronous crawling processes tasks concurrently, leading to improved performance and resource utilization. It is also perfect for handling a large number of tasks concurrently.
Implementation is more complex, and debugging can be more challenging, but in this case, the pros greatly outweigh the cons. This is why Crawlbase pushes for asynchronous crawling for LinkedIn.


