In this Web scraping Java tutorial we will enter deep crawling: an advanced form of web scraping. This comprehensive guide on web scraping in Java will use deep crawling with the Java Spring Boot to scrape the web.
Through deep crawling, even the most secluded sections of a website become accessible, revealing data that might otherwise go unnoticed.
What’s even more remarkable is that we’re not just talking theory – we will show you how to do it. Using Java Spring Boot and the Crawlbase Java library, we’ll teach you how to make deep crawling a reality. We’ll help you set up your tools, explain the difference between shallow and deep crawling (it’s not as complicated as it sounds!), and show you how to extract information from different website pages and store them on your side.
To understand the coding part of web scraping Java, you must have a basic understanding of Java Spring Boot and MySQL database. Let’s get started on how to build a web scraper in Java.
Table of Contents:
- Understanding Deep Crawling: The Gateway to Web Data
- Why do you need to build a Java Web Scraper
- How to do Web Scraping in Java
- Setting the Stage: Preparing Your Environment
- Simplify Spring Boot Project Setup with Spring Initializr
- Importing the Starter Project into Spring Tool Suite
- Understanding Your Project’s Blueprint: A Peek into Project Structure
- Starting the Coding Journey
- Running the Project and Initiating Deep Crawling
- Analyzing Output in the Database
- Conclusion
- Frequently Asked Questions
Deep Crawling in Java.
Deep crawling, also known as web scraping, is like digging deep into the internet to find lots of valuable information. In this part, we’ll talk about what deep crawling is, how it’s different from just skimming the surface of websites, and why it’s important for getting data.
Basically, deep crawling is a smart way of looking through websites and grabbing specific information from different parts of those sites. Unlike shallow crawling, which only looks at the surface stuff, deep crawling digs into the layers of websites to find hidden gems of data. This lets us gather all sorts of info, like prices of products, reviews from users, financial stats, and news articles with web scraping using Java.
Deep crawling helps us get hold of a bunch of structured and unstructured data that we wouldn’t see otherwise. By carefully exploring the internet, we can gather data that can help with business decisions, support research, and spark new ideas with Java web scraping.
Differentiating Between Shallow and Deep Crawling
Shallow crawling is like quickly glancing at the surface of a pond, just seeing what’s visible. It usually only looks at a small part of a website, like the main page or a few important ones. But it misses out on lots of hidden stuff.
On the other hand, deep crawling is like diving deep into the ocean, exploring every nook and cranny. It checks out the whole website, clicking through links and finding hidden gems tucked away in different sections. Deep crawling is super useful for businesses, researchers, and developers because it digs up a ton of valuable data that’s otherwise hard to find.
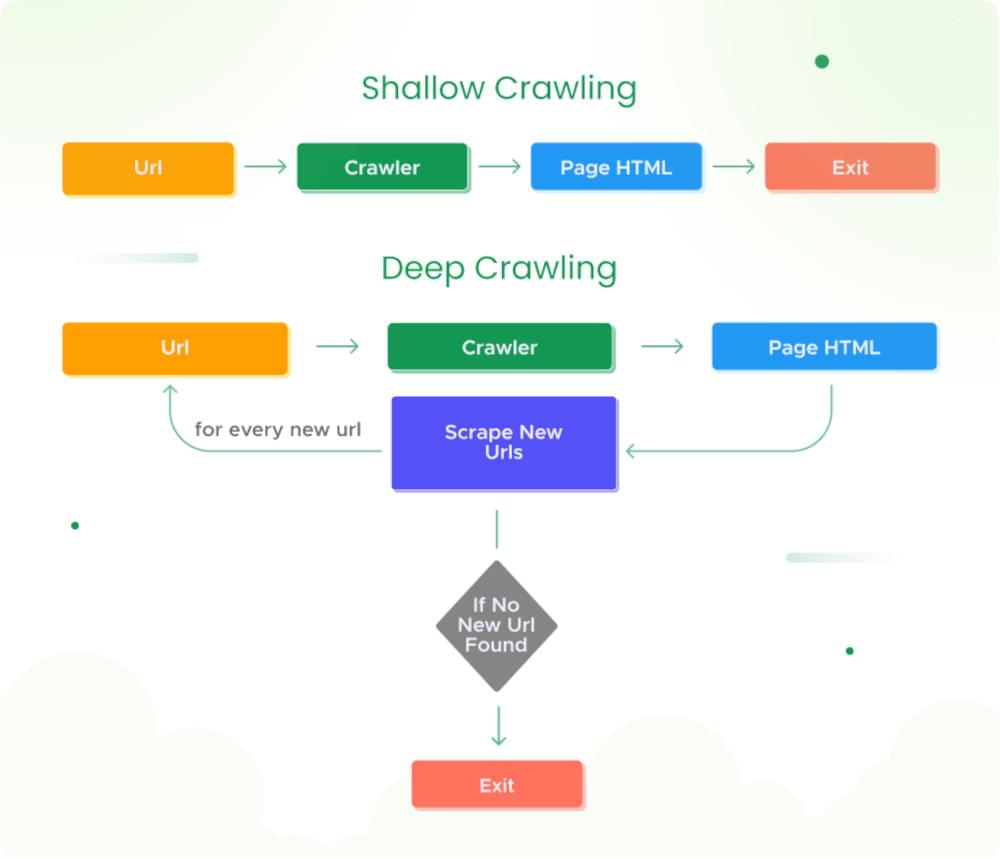
Exploring the Scope and Significance of Deep Crawling
The scope of deep crawling extends far beyond data extraction; it’s a gateway to understanding the web’s dynamics and uncovering insights that drive decision-making. From e-commerce platforms that want to monitor product prices across competitors’ sites to news organizations aiming to analyze sentiment across articles, the applications of deep crawling are as diverse as the data it reveals.
In research, deep crawling is like the base for analyzing data to understand new trends, how people use the internet, and what content they like. It’s also important for following laws and rules, because companies need to think about the right way to gather data and follow the rules of the websites they’re getting it from.
In this tutorial, we will dig deep into web scraping Java.
Why do you need to build a Java Web Scraper
You need a Java web scraper to gather and utilize website information. One such web scraper is Crawlbase Crawler, but what exactly is Crawlbase Crawler, and how does it work its magic?
What Is Crawlbase Crawler?
Crawlbase Crawler is a dynamic web data extraction tool that offers a modern and intelligent approach to collecting valuable information from websites. Unlike traditional scraping methods that involve constant polling, Crawlbase Crawler operates asynchronously. This means it can independently process requests to extract data, delivering it in real-time without the need for manual monitoring.
The Workflow: How Crawlbase Crawler Operates
Crawlbase Crawler operates on a seamless and efficient workflow that can be summarized in a few key steps:
- URLs Submission: As a user, you initiate the process by submitting URLs to the Crawlbase Crawler using the Crawling API.
- Request Processing: The Crawler receives these requests and processes them asynchronously. This means it can handle multiple requests simultaneously without any manual intervention.
- Data Extraction: The Crawler visits the specified URLs, extracts the requested data, and packages it for delivery.
- Webhook Integration: Crawlbase Crawler integrates with webhook instead of requiring manual polling. This webhook serves as a messenger that delivers the extracted data directly to your server’s endpoint in real time.
- Real-Time Delivery: The extracted data is delivered to your server’s webhook endpoint as soon as it’s available, enabling immediate access without delays.
- Fresh Insights: By receiving data in real-time, you gain a competitive edge in making informed decisions based on the latest web content.
The Benefits: Why Choose Crawlbase Crawler
While a crawler allows instant web scraping with Java , it also has some other benefits:
- Efficiency: Asynchronous processing eliminates the need for continuous monitoring, freeing up your resources for other tasks.
- Real-Time Insights: Receive data as soon as it’s available, allowing you to stay ahead of trends and changes.
- Streamlined Workflow: Webhook integration replaces manual polling, simplifying the data delivery process.
- Timely Decision-Making: Instant access to freshly extracted data empowers timely and data-driven decision-making.
To access Java web crawler, you must create it within your Crawlbase account dashboard. You can opt for the TCP or JavaScript Crawler based on your specific needs. The TCP Crawler is ideal for static pages, while the JavaScript Crawler suits content generated via JavaScript, as in JavaScript-built pages or dynamically rendered browser content. Read here to know more about Crawlbase Crawler.
During the creation, it will ask you to give your webhook address. So, we will create it after we successfully create a webhook in our Spring Boot project. In the upcoming section, we’ll dive deeper into the coding stuff and develop the required component to complete our project.
How to do Web Scraping in Java
Follow the steps below to learn web scraping in Java.
Setting the Stage: Preparing Your Environment
Before we embark on our journey into deep crawling, it’s important to set the stage for success. This section guides you through the essential steps to ensure your development environment is ready to tackle the exciting challenges ahead.
Installing Java on Ubuntu and Windows
Java is the backbone of our development process, and we have to make sure that it’s available on our system. If you don’t have Java installed on your system, you can follow the steps below as per your operating system.
Installing Java on Ubuntu:
- Open the Terminal by pressing Ctrl + Alt + T.
- Run the following command to update the package list:
1 | sudo apt update |
- Install the Java Development Kit (JDK) by running:
1 | sudo apt install default-jdk |
- Verify the JDK installation by typing:
1 | java -version |
Installing Java on Windows:
- Visit the official Oracle website and download the latest Java Development Kit (JDK).
- Follow the installation wizard’s prompts to complete the installation. Once installed, you can verify it by opening the Command Prompt and typing:
1 | java -version |
Installing Spring Tool Suite (STS) on Ubuntu and Windows:
Spring Tool Suite (STS) is an integrated development environment (IDE) specifically designed for developing applications using the Spring Framework, a popular Java framework for building enterprise-level applications. STS provides tools, features, and plugins that enhance the development experience when working with Spring-based projects; follow the steps below to install them.
- Visit the official Spring Tool Suite website at spring.io/tools.
- Download the appropriate version of Spring Tool Suite for your operating system (Ubuntu or Windows).
On Ubuntu:
- After downloading, navigate to the directory where the downloaded file is located in the Terminal.
- Extract the downloaded archive:
1 | # Replace <version> and <platform> as per the archive name |
- Move the extracted directory to a location of your choice :
1 | # Replace <bundle> as per extracted folder name |
On Windows:
- Run the downloaded installer and follow the on-screen instructions to complete the installation.
Installing MySQL on Ubuntu and Windows
Setting up a reliable database management system is paramount to kick-start your journey into deep crawling and web data extraction. MySQL, a popular open-source relational database, provides the foundation for securely storing and managing the data you’ll gather through your crawling efforts. Here’s a step-by-step guide on how to install MySQL on both Ubuntu and Windows platforms:
Installing MySQL on Ubuntu:
- Open a terminal and run the following commands to ensure your system is up-to-date:
1 | sudo apt update |
- Run the following command to install the MySQL server package:
1 | sudo apt install mysql-server |
- After installation, start the MySQL service:
1 | sudo systemctl start mysql.service |
- Check if MySQL is running with the command:
1 | sudo systemctl status mysql |
Installing MySQL on Windows:
- Visit the official MySQL website and download the MySQL Installer for Windows.
- Run the downloaded installer and choose the “Developer Default” setup type. This will install MySQL Server and other related tools.
- During installation, you’ll be asked to configure MySQL Server. Set a strong root password and remember it.
- Follow the installer’s prompts to complete the installation.
- After installation, MySQL should start automatically. You can also start it manually from Windows’s “Services” application.
Verifying MySQL Installation:
Regardless of your platform, you can verify the MySQL installation by opening a terminal or command prompt and entering the following command:
1 | mysql -u root -p |
You’ll be prompted to enter the MySQL root password you set during installation. If the connection is successful, you’ll be greeted with the MySQL command-line interface.
Now that you have Java and STS ready, you’re all set for the next phase of your deep crawling adventure. In the upcoming step, we’ll guide you through creating a Spring Boot starter project, setting the stage for your deep crawling endeavors. Let’s dive into this exciting phase of the journey!
Simplify Spring Boot Project Setup with Spring Initializr
Imagine setting up a Spring Boot project is like navigating a tricky maze of settings. But don’t worry, Spring Initializr is here to help! It’s like having a smart helper online that makes the process way easier. You could do it manually, but that’s like a puzzle that takes a lot of time. Spring Initializr comes to the rescue by making things smoother right from the start. Follow the following Steps to create Spring Boot Project with Spring Initializr.
- Go to the Spring Initializr Website
Open your web browser and go to the Spring Initializr website. You can find it at start.spring.io.
- Choose Your Project Details
Here’s where you make important choices for your project. You have to chose the type of the Project and Language you are going to use. We have to choose Maven as a Project type and JAVA as its language. For Spring Boot version, go for a stable one (like 3.1.2). Then, add details about your project, like its name and what it’s about. It’s easy – just follow the example in the picture.
- Add the Cool Stuff
Time to add special features to your project! It’s like giving it superpowers. Include Spring Web (that’s important for Spring Boot projects), Spring Data JPA, and the MySQL Driver if you’re going to use a database. Don’t forget Lombok – it’s like a magic tool that saves time. We’ll talk more about these in the next parts of the blog.
- Get Your Project
After picking all the good stuff, click “GENERATE.” Your Starter project will download as a zip file. Once it’s done, open the zip file to see the beginning of your project.
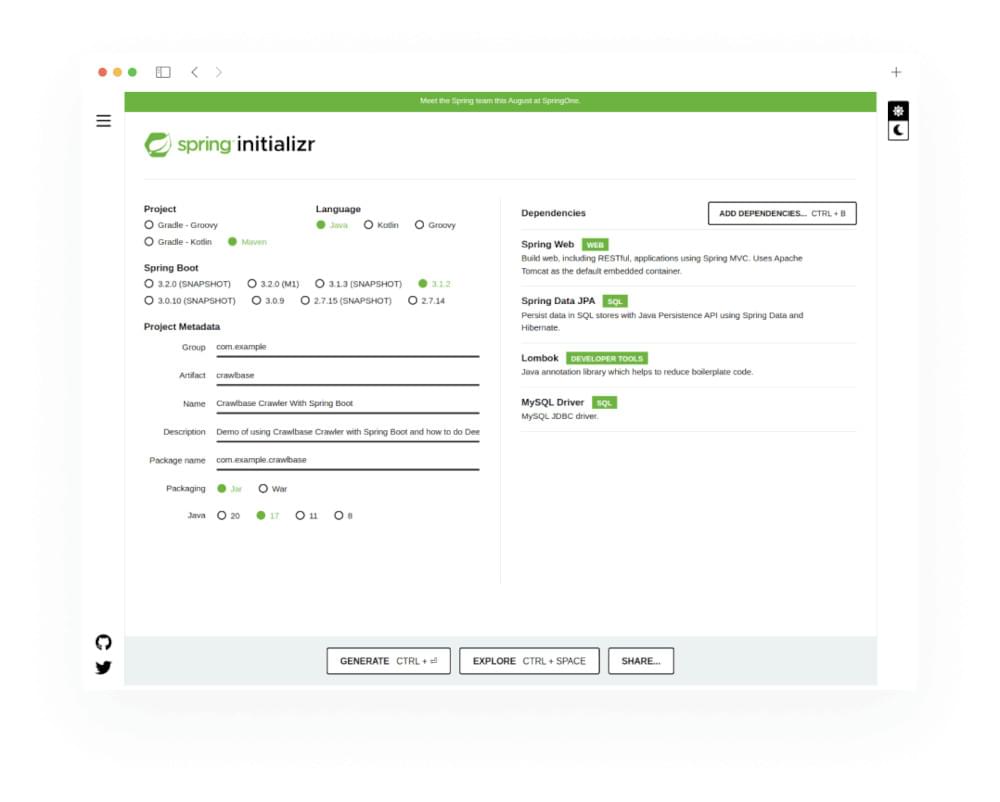
By following these steps, you’re ensuring your deep crawling adventure starts smoothly. Spring Initializr is like a trusty guide that helps you set up. In the upcoming section, we’ll guide you through importing your project into the Spring Tool Suite you’ve installed. Get ready to kick-start this exciting phase of your deep crawling journey!
Importing the Starter Project into Spring Tool Suite
Alright, now that you’ve got your Spring Boot starter project all setup and ready to roll, the next step is to import it into Spring Tool Suite (STS). It’s like inviting your project into a cozy workspace where you can work your magic. Here’s how you do it:
- Open Spring Tool Suite (STS)
First things first, fire up your Spring Tool Suite. It’s your creative hub where all the coding and crafting will happen.
- Import the Project
Navigate to the “File” menu and choose “Import.” A window will pop up with various options – select “Existing Maven Projects” and click “Next.”
- Choose Project Directory
Click the “Browse” button and locate the directory where you unzipped your Starter project. Select the project’s root directory and hit “Finish.”
- Watch the Magic
Spring Tool Suite will work its magic and import your project. It appears in the “Project Explorer” on the left side of your workspace.
- Ready to Roll
That’s it! Your Starter project is now comfortably settled in Spring Tool Suite. You’re all set to start building, coding, and exploring.
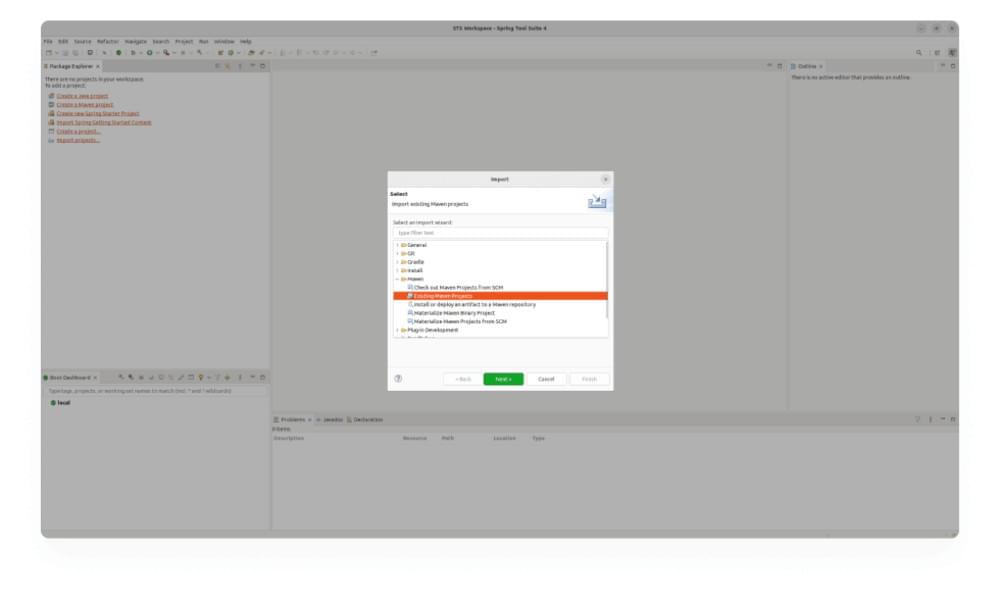
Bringing your project into Spring Tool Suite is like opening the door to endless possibilities. Now you have the tools and space to make your project amazing. The following section will delve into the project’s structure, peeling back the layers to reveal its components and inner workings. Get ready to embark on a journey of discovery as we unravel what lies within!
Understanding Your Project’s Blueprint: A Peek into Project Structure
Now that your Spring Boot starter project is comfortably nestled within Spring Tool Suite (STS) let’s take a tour of its inner workings. It’s like getting to know the layout of your new home before you start decorating it.
Maven and pom.xml
At the core of your project lies a powerful tool called Maven. Think of Maven as your project’s organizer – it manages libraries, dependencies, and builds. The file named pom.xml is where all the project-related magic happens. It’s like the blueprint that tells Maven what to do and what your project needs. As in our case, currently, we will have this in the pom.xml project.
1 |
|
Java Libraries
Remember those special features you added when creating the project? They’re called dependencies, like magical tools that make your project more powerful. You were actually adding these libraries when you included Spring Web, Spring Data JPA, MySQL Driver, and Lombok from the Spring Initializr. You can see those in the pom.xml above. They bring pre-built functionality to your project, saving you time and effort.
- Spring Web: This library is your ticket to building Spring Boot web applications. It helps with things like handling requests and creating web controllers.
- Spring Data JPA: This library is your ally if you’re dealing with databases. It simplifies database interactions and management, letting you focus on your project’s logic.
- MySQL Driver: When you’re using MySQL as your database, this driver helps your project communicate with the database effectively.
- Lombok: Say goodbye to repetitive code! Lombok reduces the boilerplate code you usually have to write, making your project cleaner and more concise.
Understand the Project Structure
As you explore your project’s folders, you’ll notice how everything is neatly organized. Your Java code goes into the src/main/java directory, while resources like configuration files and static assets reside in the src/main/resources directory. You’ll also find the application.properties file here – it’s like the control center of your project, where you can configure settings.
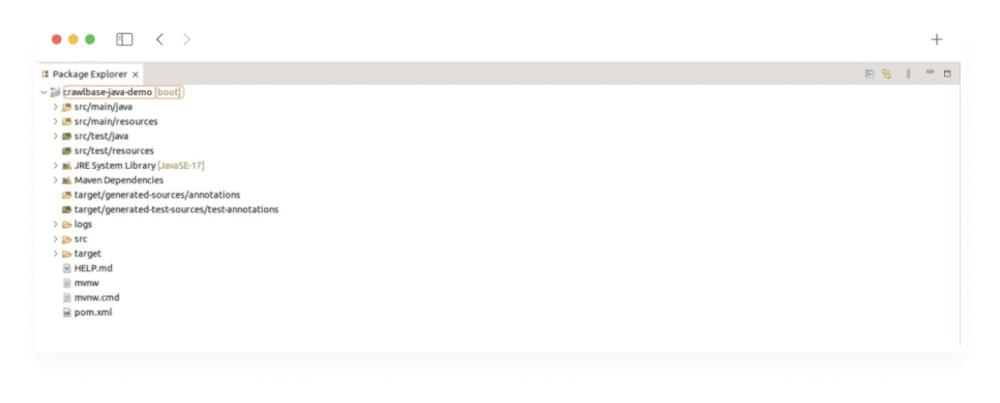
In the src/main/java directory we will find a package containing a Java Class with main function. This file act as the starting point while execution of Spring Boot Project. In our case, we will have CrawlbaseApplication.java file with following code.
1 | package com.example.crawlbase; |
Now that you’re familiar with the essentials, you can confidently navigate your project’s landscape. Before starting with the coding, we’ll dive into Crawlbase and try to understand how it works and how we can use it in our project. So, get ready to uncover the true power of crawler.
Starting the Coding Journey to Java Scraping
Now that you have Java web scraping framework, Java web scraping library and Java web scraper set up, it’s time to dive into coding of Java web scraping tutorial. This section outlines the essential steps to create controllers, services, repositories, and update properties files. Before getting into the nitty-gritty of coding, we need to lay the groundwork and introduce key dependencies that will empower our project.
Since we’re using the Crawlbase Crawler, it’s important to ensure that we can easily use it in our Java project. Luckily, Crawlbase provides a Java library that makes this integration process simpler. To add it to our project, we just need to include the appropriate Maven dependency in the project’s pom.xml file.
1 | <dependency> |
After adding this dependency, a quick Maven Install will ensure that the Crawlbase Java library is downloaded from the Maven repository and ready for action.
Integrating JSoup Dependency
Given that we’ll be diving deep into HTML content, having a powerful HTML parser at our disposal is crucial. Enter JSoup, a robust and versatile HTML parser for Java. It offers convenient methods for navigating and manipulating HTML structures. To leverage its capabilities, we need to include the JSoup library in our project through another Maven dependency:
1 | <dependency> |
Setting Up the Database
Before we proceed further, let’s lay the foundation for our project by creating a database. Follow these steps to create a MySQL database:
- Open the MySQL Console: If you’re using Ubuntu, launch a terminal window. On Windows, open the MySQL Command Line Client or MySQL Shell.
- Log In to MySQL: Enter the following command and input your MySQL root password when prompted:
1 | mysql -u root -p |
- Create a New Database: Once logged in, create a new database with the desired name:
1 | # Replace database_name with your chosen name |
Planning the Models
Before diving headfirst into model planning, let’s understand what the crawler returns when URLs are pushed to it and what response we receive at our webhook. When we send URLs to the crawler, it responds with a Request ID, like this:
1 | { "rid": "1e92e8bff32c31c2728714d4" } |
Once the crawler has effectively crawled the HTML content, it forwards the output to our webhook. The response will look like this:
1 | Headers: |
So, taking this into the account, we can consider the following database structure.
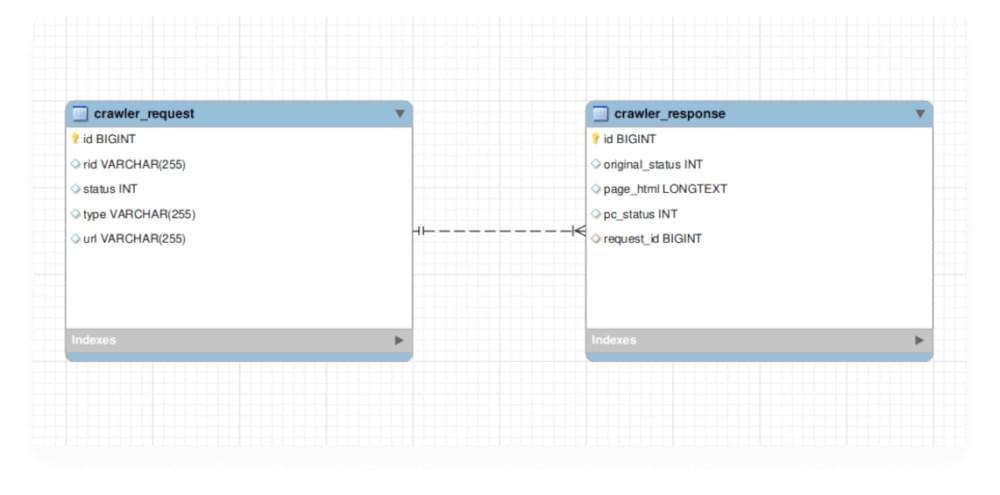
We don’t need to create the database tables directly as we will make our Spring Boot Project to automatically initialize the tables when we run it. We will make Hibernate to do this for us.
Designing the Model Files
With the groundwork laid in the previous section, let’s delve into the creation of our model files. In the com.example.crawlbase.models package, we’ll craft two essential models: CrawlerRequest.java and CrawlerResponse.java. These models encapsulate the structure of our database tables, and to ensure efficiency, we’ll employ Lombok to reduce boilerplate code.
CrawlerRequest Model:
1 | package com.example.crawlbase.models; |
CrawlerResponse Model:
1 | package com.example.crawlbase.models; |
Establishing Repositories for Both Models
Following the creation of our models, the next step is to establish repositories for seamless interaction between our project and the database. These repository interfaces serve as essential connectors, leveraging the JpaRepository interface to provide fundamental functions for data access. Hibernate, a powerful ORM tool, handles the underlying mapping between Java objects and database tables.
Create a package com.example.crawlbase.repositories and within it, create two repository interfaces, CrawlerRequestRepository.java and CrawlerResponseRepository.java.
CrawlerRequestRepository Interface:
1 | package com.example.crawlbase.repositories; |
CrawlerResponseRepository Interface:
1 | package com.example.crawlbase.repositories; |
Planing APIs and Request Body Mapper Classes
Harnessing the Crawlbase Crawler involves designing two crucial APIs: one for pushing URLs to the crawler and another serving as a webhook. To begin, let’s plan the request body structures for these APIs.
Push URL request body:
1 | { |
As for the webhook API’s request body, it must align with the Crawler’s response structure, as discussed earlier. You can read more about it here.
In line with this planning, we’ll create two request mapping classes in the com.example.crawlbase.requests package:
CrawlerWebhookRequest Class:
1 | package com.example.crawlbase.requests; |
ScrapeUrlRequest Class:
1 | package com.example.crawlbase.requests; |
Creating a ThreadPool to optimize webhook
If we don’t optimize our webhook to handle large amount of requests, it will cause hidden problems. This is where we can use multi-threading. In JAVA, ThreadPoolTaskExecutor is used to manage a pool of worker threads for executing asynchronous tasks concurrently. This is particularly useful when you have tasks that can be executed independently and in parallel.
Create a new package com.example.crawlbase.config and create ThreadPoolTaskExecutorConfig.java file in it.
ThreadPoolTaskExecutorConfig Class:
1 | package com.example.crawlbase.config; |
Creating the Controllers and their Services
Since we need two APIs and there business logic is much different, we will implement them in the separate controllers. Separate Controllers mean we will have separate services. Let’s first create a MainController.java and its service as MainService.java. We will implement the API you push URL on the Crawler in this controller.
Create a new package com.example.crawlbase.controllers for controllers and com.example.crawlbase.services for services in the project.
MainController Class:
1 | package com.example.crawlbase.controllers; |
As you can see above we have created a restful API “@POST /scrape/push-urls” which will be responsible for handling the request for pushing URLs to the Crawler.
MainService Class:
1 | package com.example.crawlbase.services; |
In the above service, we created an Async method to process the request asynchronously. pushUrlsToCrawler function uses the Crawlbase library to push URLs to the Crawler and then save the received RID and other attributes into the crawler_request table. To push URLs to the Crawler, we must use the “crawler” and “callback” parameters. We are also using “callback_headers” to send a custom header “type,” which we will use to know whether the URL is the one we gave or it is scraped while deep crawling. You can read more about these parameters and many others here.
Now we have to implement the API we will use a a webhook. For this create WebhookController.java in the com.example.crawlbase.controllers package and WebhookService.java in the com.example.crawlbase.services package.
WebhookController Class:
1 | package com.example.crawlbase.controllers; |
In the above code, you can see that we have created a restful API, “@POST /webhook/crawlbase”, which will be responsible for receiving the response from the output request from the Crawler. You can notice in the code that we ignore the calls with USER_AGENT as “Crawlbase Monitoring Bot 1.0” because Crawler Monitoring Bot requests this user agent to check if the callback is live and accessible. So, no need to process this request. Just return a successful response to the Crawler.
While working with Crawlbase Crawler, Your server webhook should…
- Be publicly reachable from Crawlbase servers
- Be ready to receive POST calls and respond within 200ms
- Respond within 200ms with a status code 200, 201 or 204 without content
WebhookService Class:
1 | package com.example.crawlbase.services; |
The WebhookService class serves a crucial role in efficiently handling webhook responses and orchestrating the process of deep crawling. When a webhook response is received, the handleWebhookResponse method is invoked asynchronously from the WebhookController’s crawlbaseCrawlerResponse function. This method starts by unzipping the compressed HTML content and extracting the necessary metadata and HTML data. The extracted data is then used to construct a CrawlerWebhookRequest object containing details like status, request ID (rid), URL, and HTML content.
Next, the service checks if there’s an existing CrawlerRequest associated with the request ID. If found, it constructs a CrawlerResponse object to encapsulate the pertinent response details. This CrawlerResponse instance is then persisted in the database through the CrawlerResponseRepository.
However, what sets this service apart is its ability to facilitate deep crawling. If the webhook response type indicates a “parent” URL, the service invokes the deepCrawlParentResponse method. In this method, the HTML content is parsed using the Jsoup library to identify hyperlinks within the page. These hyperlinks, representing child URLs, are processed and validated. Only URLs belonging to the same hostname and adhering to a specific format are retained.
The MainService is then employed to push these valid child URLs into the crawling pipeline, using the “child” type as a flag. This initiates a recursive process of deep crawling, where child URLs are further crawled, expanding the exploration to multiple levels of interconnected pages. In essence, the WebhookService coordinates the intricate dance of handling webhook responses, capturing and preserving relevant data, and orchestrating the complicated process of deep crawling by intelligently identifying and navigating through parent and child URLs.
Updating application.properties File
In the final step, we will configure the application.properties file to define essential properties and settings for our project. This file serves as a central hub for configuring various aspects of our application. Here, we need to specify database-related properties, Hibernate settings, Crawlbase integration details, and logging preferences.
Ensure that your application.properties file includes the following properties:
1 | # Database Configuration |
You can find your Crawlbase TCP (normal) token here. Remember to replace the placeholders in above code with your actual values, as determined in the previous sections. This configuration is vital for establishing database connections, synchronizing Hibernate operations, integrating with the Crawlbase API, and managing logging for your application. By carefully adjusting these properties, you’ll ensure seamless communication between different components and services within your project.
Running the Project and Initiating Deep Crawling
With the coding phase complete, the next step is to set the project in motion. Spring Boot, at its core, employs an embedded Apache Tomcat build that caters to smooth transitions from development to production and integrates seamlessly with prominent platforms-as-a-service. Executing the project within Spring Tool Suite (STS) involves a straightforward process:
- Right-click the project in the STS project structure tree.
- Navigate to the “Run As” menu. and
- Select “Spring Boot App”.
This action triggers the project to launch on localhost, port 8080.
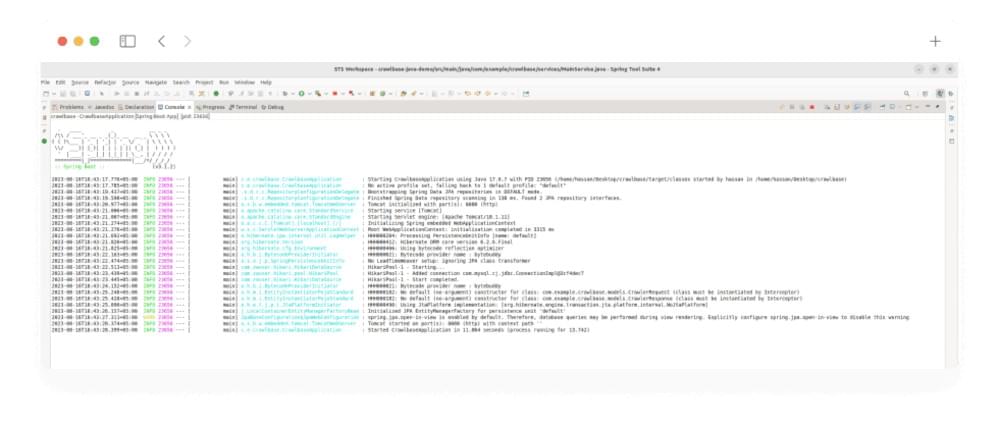
Making the Webhook Publicly Accessible
Since the webhook we’ve established resides locally on our system at localhost, port 8080, we need to grant it public accessibility. Enter Ngrok, a tool that creates secure tunnels, granting remote access without the need to manipulate network settings or router ports. Ngrok is executed on port 8080 to render our webhook publicly reachable.
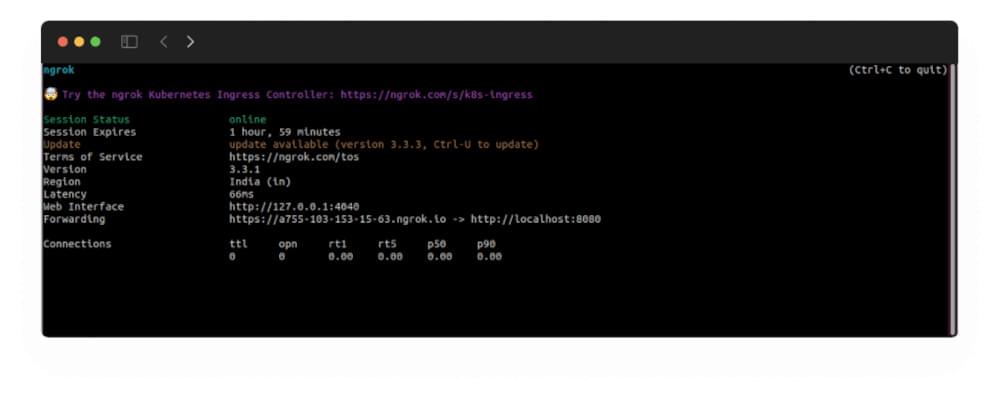
Ngrok conveniently provides a public Forwarding URL, which we will later utilize with Crawlbase Crawler.
Creating the Crawlbase Crawler
Recall our earlier discussion on Crawlbase Crawler creation via the Crawlbase dashboard. Armed with a publicly accessible webhook through Ngrok, crafting the crawler becomes effortless.
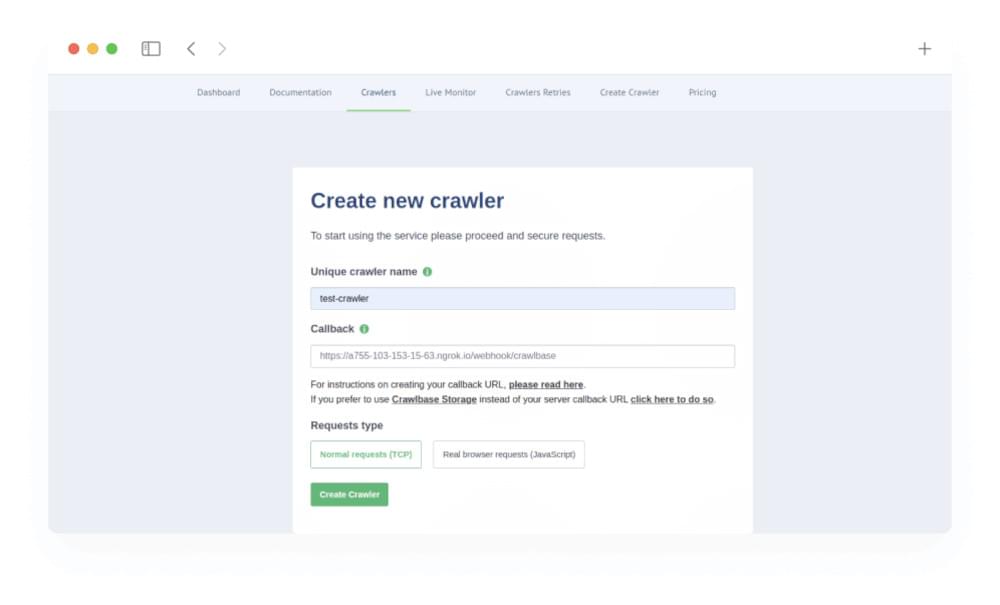
In the depicted instance, the ngrok forwarding URL collaborates with the webhook address “/webhook/crawlbase” as a callback. This fusion yields a fully public webhook address. We christen our crawler as “test-crawler,” a name that will be incorporated into the project’s application.properties file. The selection of TCP Crawler aligns with our choice. Upon hitting the “Create Crawler” button, the crawler takes shape, configured according to the specified parameters.
Initiating Deep Crawling by Pushing URLs
Following the creation of the crawler and the incorporation of its name into the application.properties file, we’re poised to interact with the “@POST /scrape/push-urls” API. Through this API, we send URLs to the crawler, triggering the deep crawl process. Let’s exemplify this by pushing the URL http://www.3bfluidpower.com/.
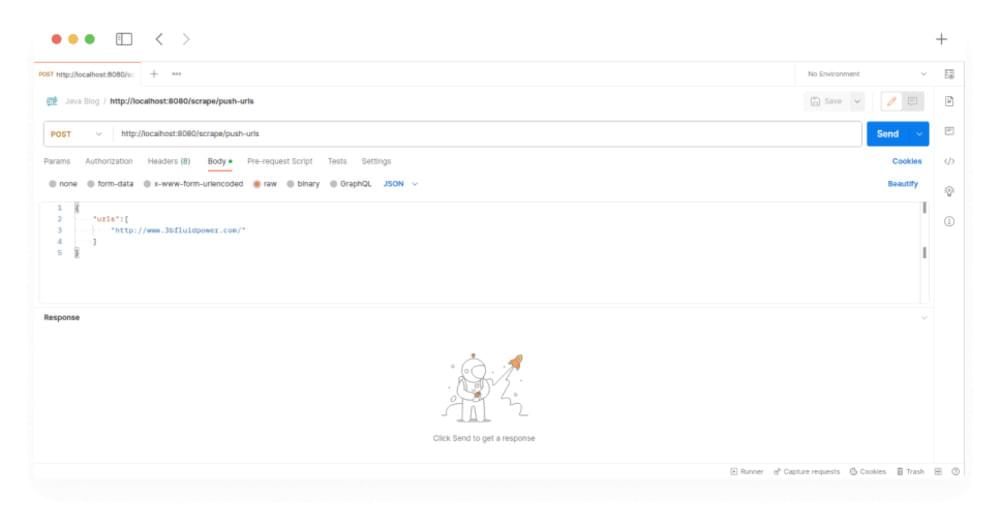
With this proactive approach, we set the wheels of deep crawling in motion, utilizing the power of Crawlbase Crawler to delve into the digital landscape and unearth valuable insights.
Analyzing Output in the Database
Upon initiating the URL push to the Crawler, a Request ID (RID) is returned—a concept elaborated on in prior discussions—marking the commencement of the page’s crawling process on the Crawler’s end. This strategic approach eliminates the wait time typically associated with the crawling process, enhancing the efficiency and effectiveness of data acquisition. Once the Crawler concludes the crawling, it seamlessly transmits the output to our webhook.
The Custom Headers parameter, particularly the “type” parameter, proves instrumental in our endeavor. Its presence allows us to distinguish between the URLs we pushed and those discovered during deep crawling. When the type is designated as “parent,” the URL stems from our submission, prompting us to extract fresh URLs from the crawled HTML and subsequently funnel them back into the Crawler—this time categorized as “child.” This strategy ensures that only the URLs we introduced undergo deep crawling, streamlining the process.
In our current scenario, considering a singular URL submission to the Crawler, the workflow unfolds as follows: upon receiving the crawled HTML, the webhook service stores it in the crawler_response table. Subsequently, the deep crawling of this HTML takes place, yielding newly discovered URLs that are then pushed to the Crawler.
crawler_request Table:
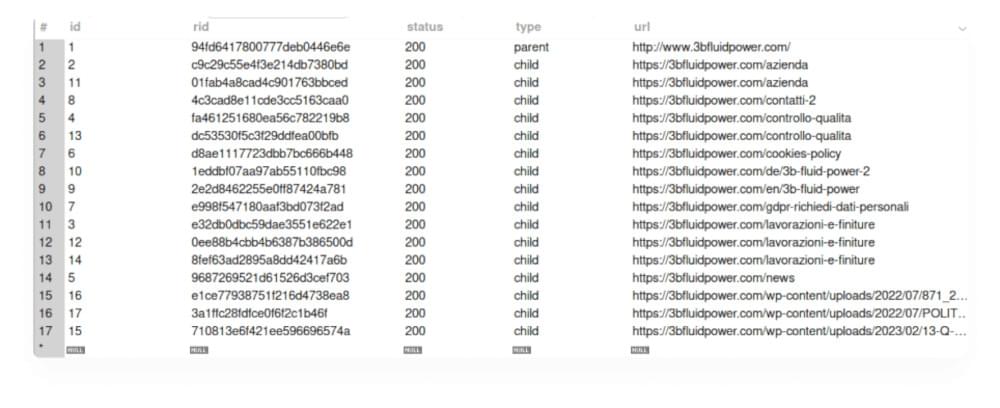
As you can see above, at our webhook service, we found 16 new URLs from the HTML of the page who’s URL we push to the Crawler in the previous section, which we save in the database with “type: parent”. We push all the new URLs found to the crawler to deep crawl the given URL. Crawler will crawl all of them and push the output on our webhook. We are saving the crawled HTML in the crawler_response table.
crawler_response Table:
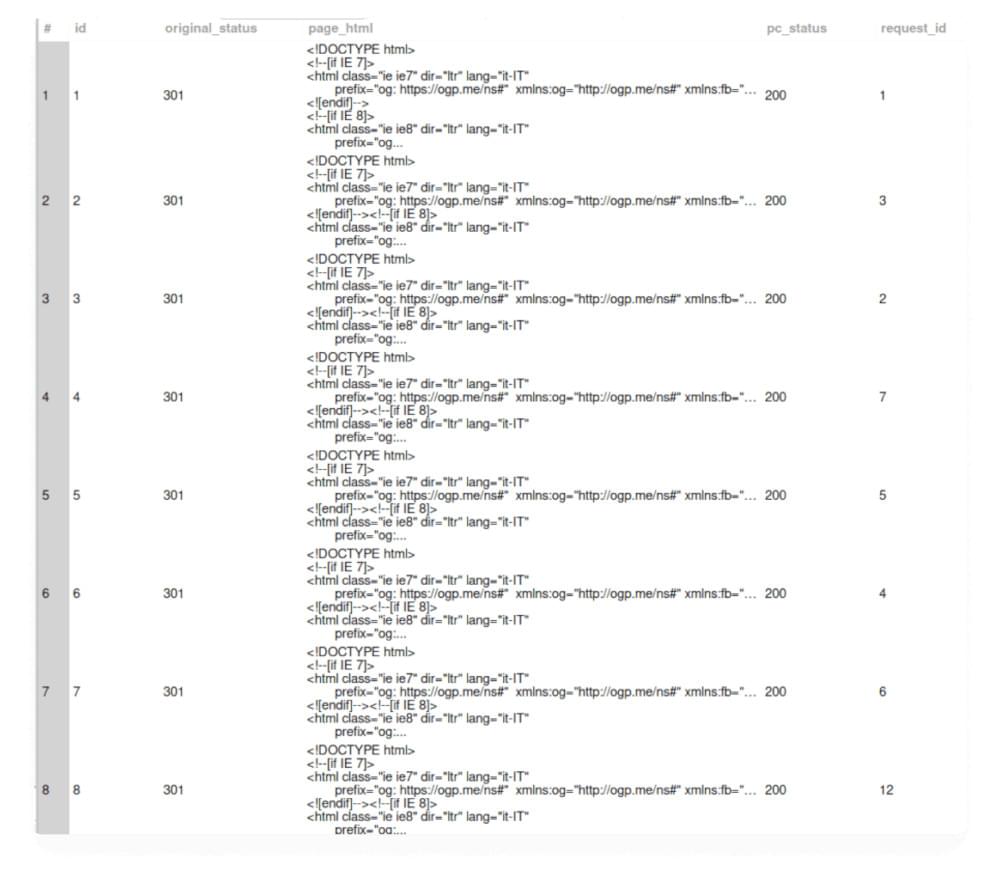
As you can see in the above table view, all the information we get at our webhook is saved in the table. Once you have the HTML at your webhook, we can scrape any information we want. This detailed process highlights how deep crawling works, allowing us to discover important information from web content.
Conclusion
Throughout this exploration of web scraping with Java and Spring Boot, we have navigated the critical steps of setting up a Java environment tailored for web scraping, selecting the appropriate libraries, and executing both simple and sophisticated web scraping projects. This journey underscores Java’s versatility and robustness in extracting data from the web, highlighting tools such as JSoup, Selenium, and HtmlUnit for their unique strengths in handling both static and dynamic web content. By equipping readers with the knowledge to tailor their web scraping endeavors to project-specific requirements, this article serves as a comprehensive guide to the complexities and possibilities of web scraping with Java.
As we conclude, it’s clear that mastering web scraping in Java opens up a plethora of opportunities for data extraction, analysis, and application. Whether the goal is to monitor market trends, aggregate content, or gather insightful data from across the web, the techniques and insights provided here lay a solid foundation for both novices and experienced developers alike. While challenges such as handling dynamic content and evading security measures persist, the evolving nature of Java web scraping tools promises continual advancements. Therefore, staying informed and adaptable will be key to harnessing the full potential of web scraping technologies in the ever-evolving landscape of the internet.
Thank you for joining us on this journey. You can find the full source code of the project on GitHub here. May your web data endeavors be as transformative as the tools and knowledge you’ve gained here. As the digital landscape continues to unfold, remember that the power to innovate is in your hands.
For more tutorials like these follow our blog, here are some java tutorial guides you might be interested in
How to Scrape G2 Product Reviews
Frequently Asked Questions
Q: Do I need to use JAVA to use the Crawler?
No, you do not need to use JAVA exclusively to use the Crawlbase Crawler. The Crawler provides multiple libraries for various programming languages, enabling users to interact with it using their preferred language. Whether you are comfortable with Python, JavaScript, Java, Ruby, or other programming languages, Crawlbase has you covered. Additionally, Crawlbase offers APIs that allow users to access the Crawler’s capabilities without relying on specific libraries, making it accessible to a wide range of developers with different language preferences and technical backgrounds. This flexibility ensures that you can seamlessly integrate the Crawler into your projects and workflows using the language that best suits your needs.
Q: Can you use Java for web scraping?
Yes, Java is a highly capable programming language that has been used for a variety of applications, including web scraping. It has evolved significantly over the years and supports various tools and libraries specifically for scraping tasks.
Q: Which Java library is most effective for web scraping?
For web scraping in Java, the most recommended libraries are JSoup, HtmlUnit, and Selenium WebDriver. JSoup is particularly useful for extracting data from static HTML pages. For dynamic websites that utilize JavaScript, HtmlUnit and Selenium WebDriver are better suited.
Q: Between Java and Python, which is more suitable for web scraping?
Python is generally preferred for web scraping over Java. This preference is due to Python’s simplicity and its rich ecosystem of libraries such as BeautifulSoup, which simplifies parsing and navigating HTML and XML documents.
Q: What programming language is considered the best for web scraping?
Python is considered the top programming language for web scraping tasks. It offers a comprehensive suite of libraries and tools like BeautifulSoup and Scrapy, which are designed to facilitate efficient and effective web scraping.


