You don’t need to be a programmer anymore to automate complex workflows. Tasks like web scraping, data processing, and generating insights used to require hiring a developer. Now? You can do it yourself with the right tools. The barrier between technical and non-technical work is shrinking fast, and if you’ve been curious about building your own automations, there’s no better time to start.
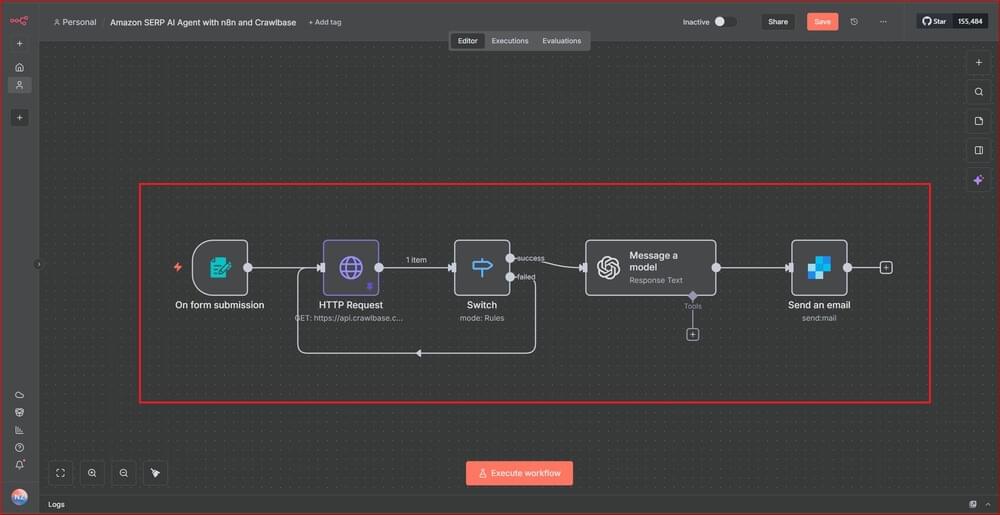
That’s the idea behind this walkthrough. We’ll put together a simple but practical setup using Crawlbase, n8n, and an AI model to create an Amazon product analysis assistant. The entire workflow is straightforward, and it looks something like this:
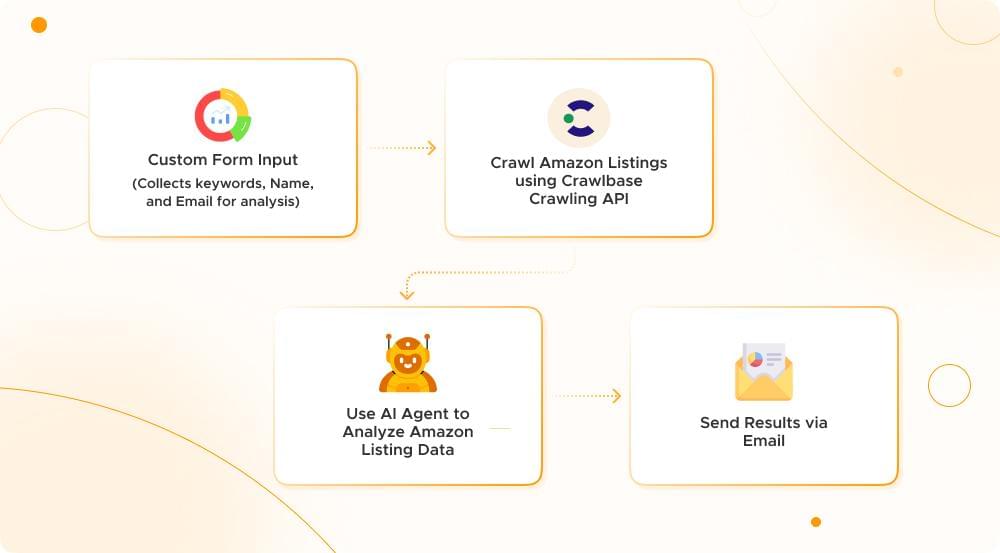
Each step plays its own role: a small form collects the keyword and user details, Crawlbase retrieves the Amazon listings, the AI processes everything, and the final summary is delivered by email. It’s a clean, automated loop that runs without needing a technical background.
This type of setup is useful for product researchers, e-commerce teams tracking competitors, agencies validating niches, or anyone who needs quick insights without digging through product pages manually.
Ready to start? Here’s a short tutorial on how to build an Amazon AI agent with n8n and Crawlbase:
What You Need to Build the Amazon AI Agent
1. Crawlbase account with an API key
This is what actually fetches the Amazon search results for you. You’re all set if you already use Crawlbase. If not, creating an account and pulling your API key only takes a minute.
2. An n8n account (self-hosted or n8n.cloud)
n8n is where you connect all the pieces. Either host it yourself or use the cloud version if you don’t feel like dealing with servers.
3. OpenAI API key (or another AI provider)
The AI agent needs a brain, and this is it. Any model that can summarize text will work. Just make sure you have an active API key so n8n can talk to it.
4. A SendGrid account for sending emails
This part handles the delivery. Without it, your nicely processed summary has nowhere to go. A free-tier SendGrid account is usually enough for this project.
5. Familiarity with n8n workflows
As long as you can drag nodes around and set a few fields, you’ll be fine. The steps here are straightforward, and we’ll walk through them anyway.
Step-by-Step Guide for Building the Amazon AI Automation
Step 1: Start with a Form Trigger
Create a new workflow in n8n, click the “Add first step…” box, and choose “On form submission” from the trigger list.
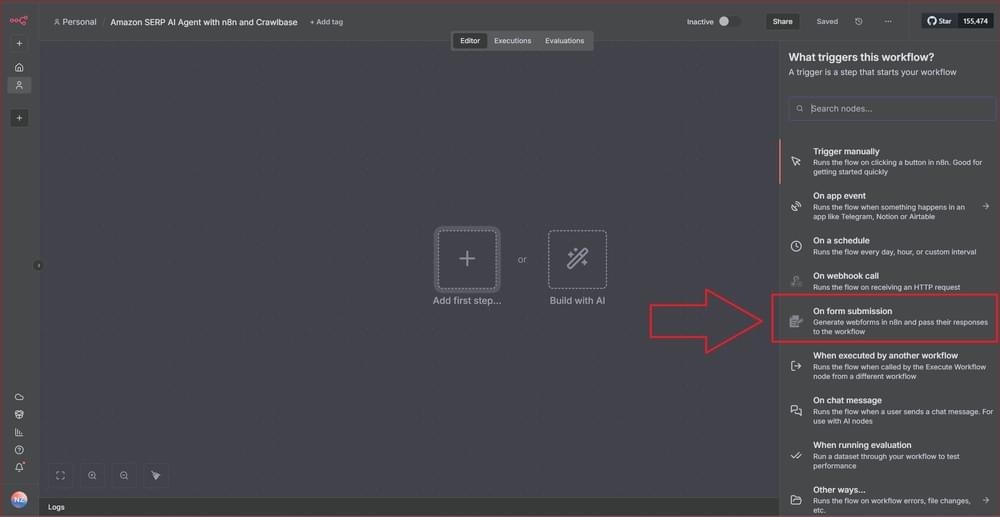
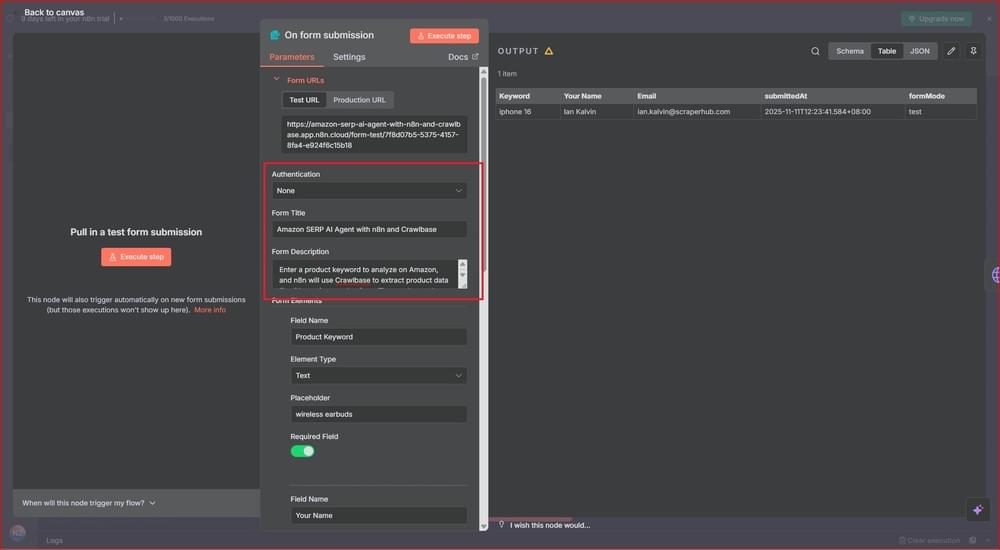
Then add the following value in each field:
On form submission
| Field Name | Value |
|---|---|
| Authentication | None |
| Form Title | Amazon SERP AI Agent with n8n and Crawlbase |
| Form Description | Enter a product keyword to analyze on Amazon, and n8n will use Crawlbase to extract product data like titles, prices, and ratings. The results are then sent to an AI Agent for quick analysis and summary. |
| Respond When | Workflow Finishes |
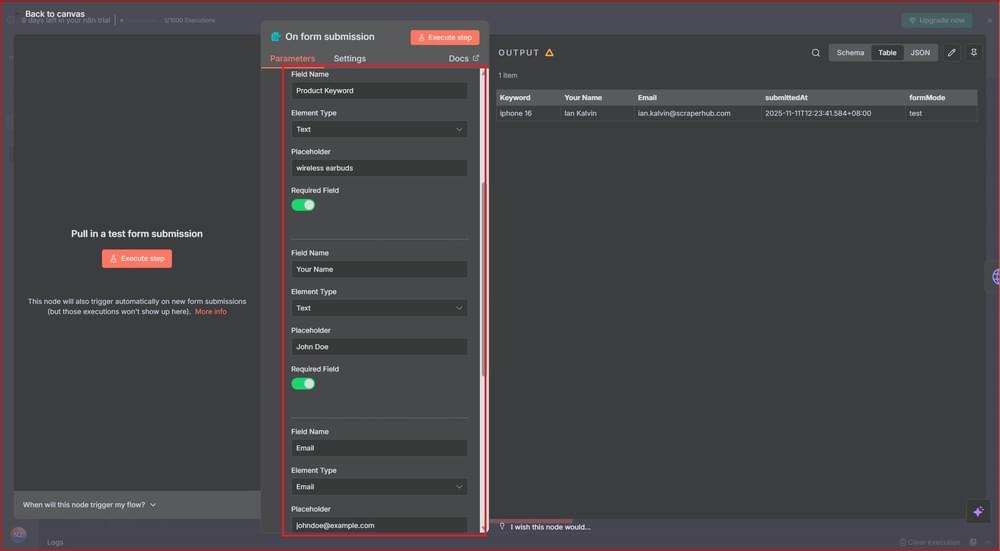
Add Form Elements
| Field Name | Element Type | Placeholder | Required Field |
|---|---|---|---|
| Product Keyword | Text | wireless earbuds | Yes |
| Your Name | Text | John Doe | Yes |
| [email protected] | Yes |
Scroll down to Options, and add the following under the Form Response section:
Form Response
| Field Name | Value |
|---|---|
| Respond With | Form Submitted Text |
| Text to Show | Please check your email |
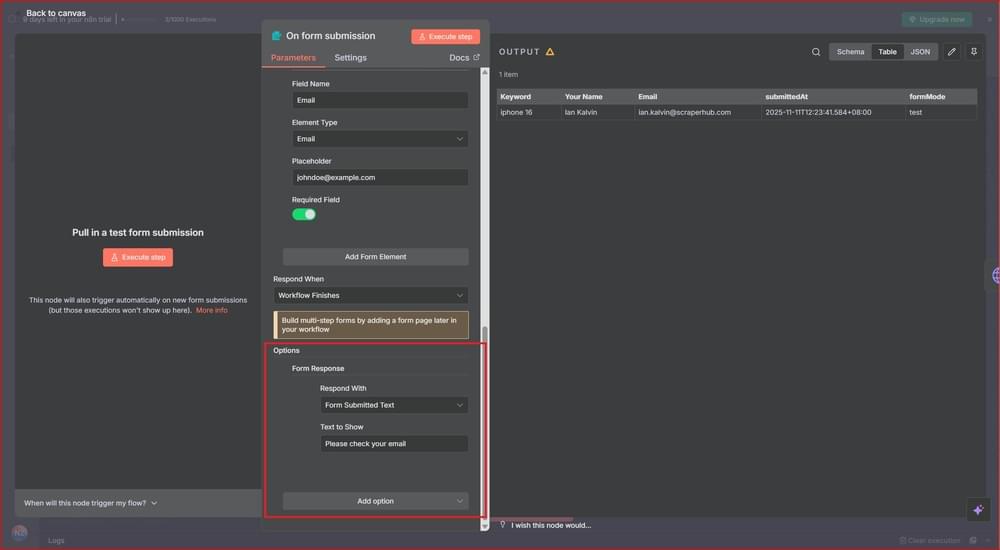
Step 2: Add an HTTP Request Node
After the form trigger, click the plus (+) button next to it to add the next step. In the search bar on the right, type “HTTP”, then select “HTTP Request”
We’ll use this node to send the keyword from the form to Crawlbase and fetch the Amazon search results.
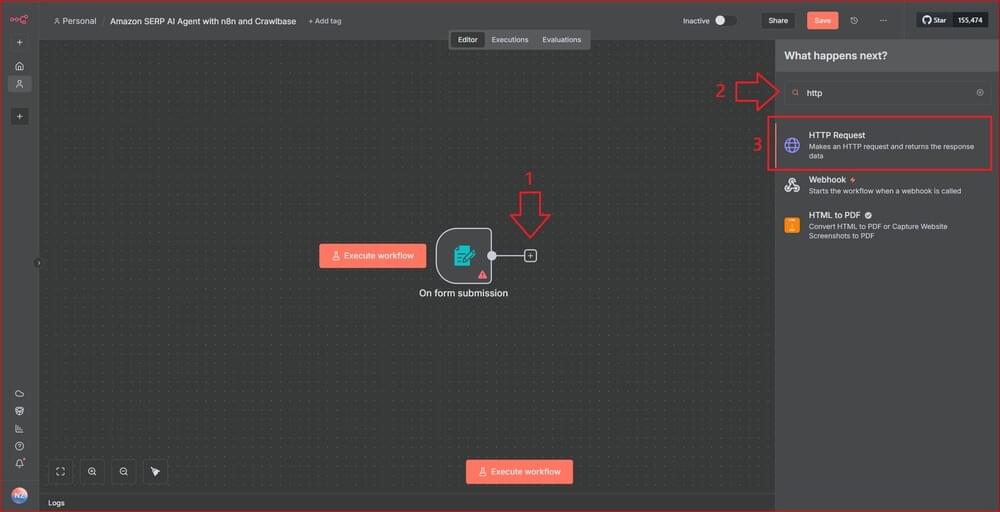
Now configure the HTTP Request node. Here’s what you need to enter:
HTTP Request node
| Field Name | Value |
|---|---|
| Method | GET |
| URL | https://api.crawlbase.com |
| Send Query Parameters | Yes |
| Specify Query Parameters | Using Fields Below |
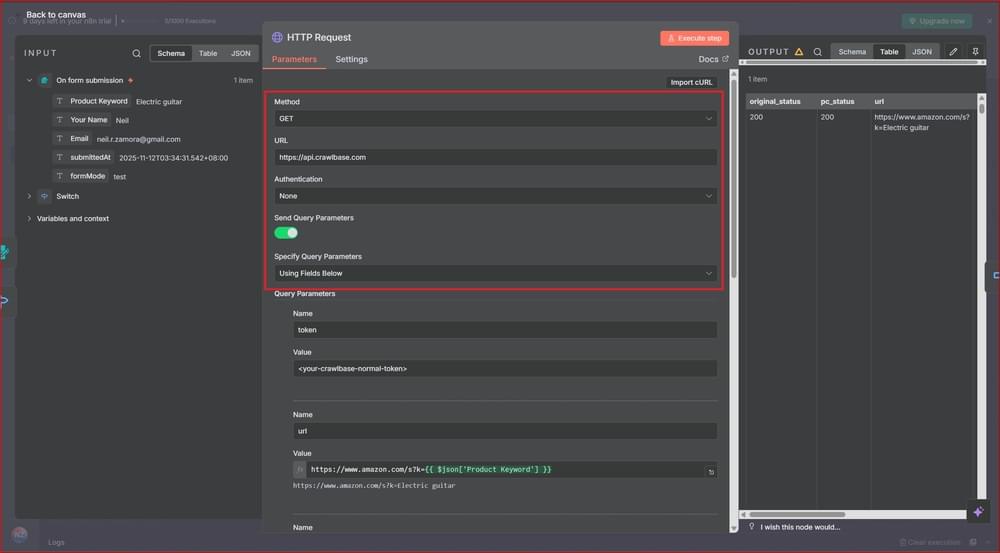
After that, scroll down to the Query Parameters tab and enter these values:
HTTP Query Param
| Parameter Name | Value |
|---|---|
| token | <your-crawlbase-normal-token> |
| url | https://www.amazon.com/s?k={{ $json['Product Keyword'] }} |
| scraper | amazon-serp |
For the URL field, you can either type the expression manually or simply drag the Product Keyword field from the left panel into the value box. n8n will automatically insert the correct expression for you.
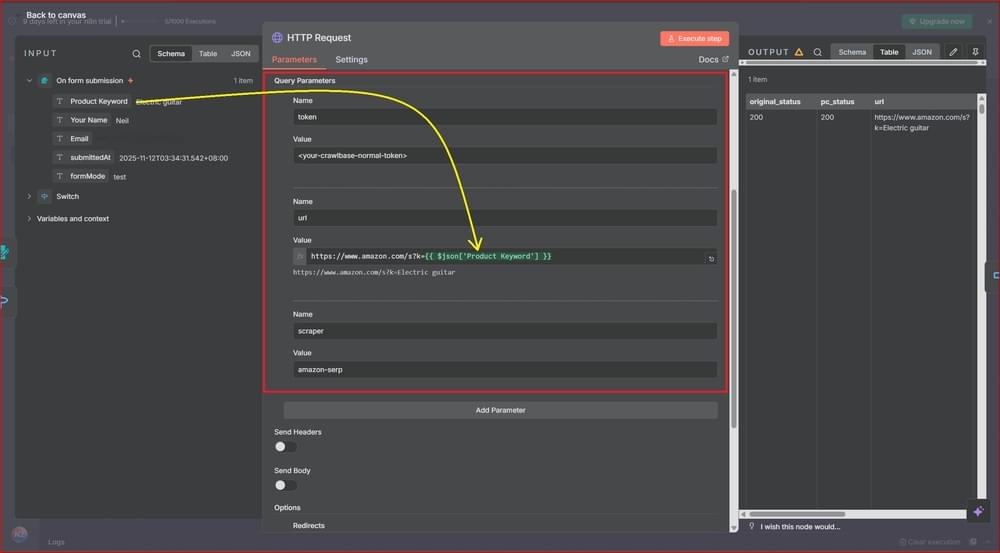
Step 3: Add a Switch Node for Automatic Retry
To add the node, click the plus (+) button again after the HTTP Request node and search for Switch.
The idea is straightforward: if Crawlbase returns an unexpected or failed response, the workflow loops back and tries again automatically. Since Crawlbase doesn’t charge for failed requests, this ensures you only move forward when a valid result is available.
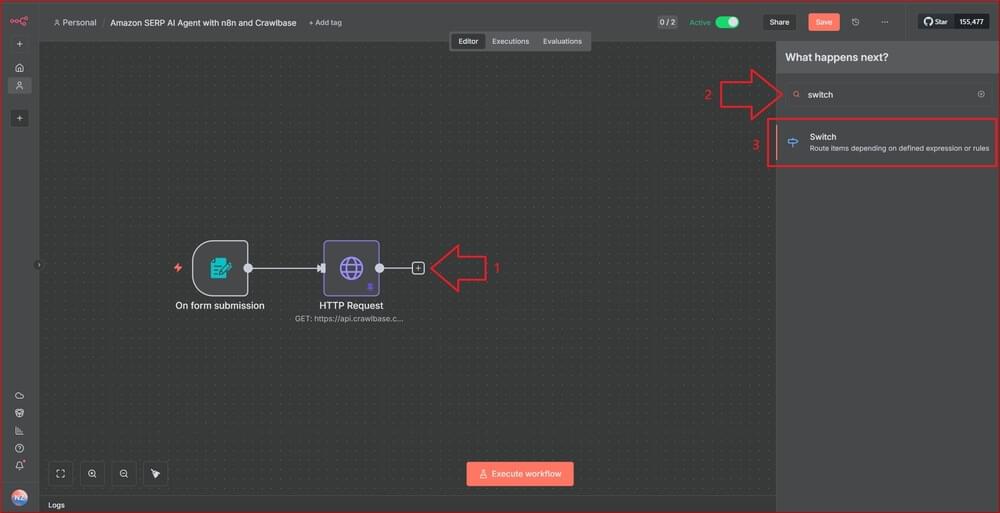
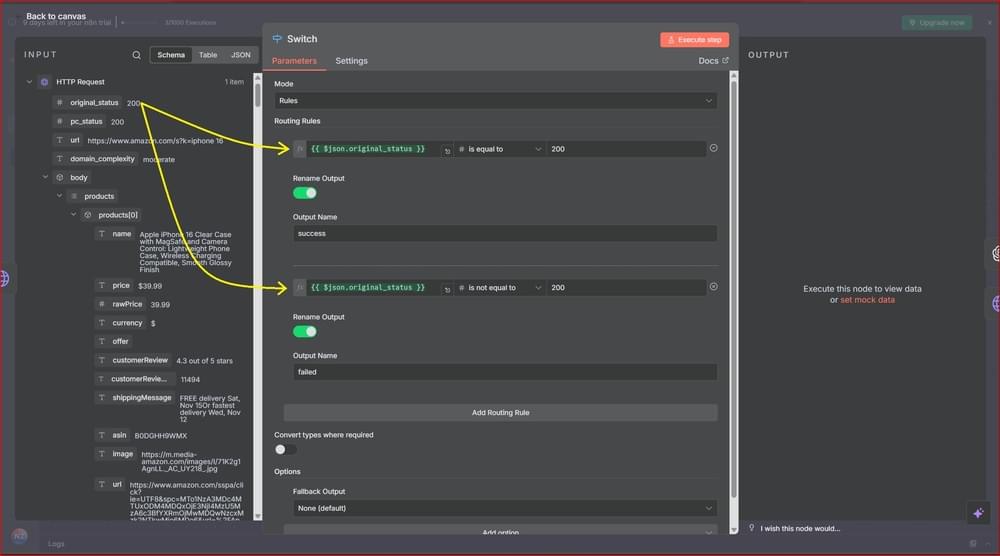
Set up the Switch node as follows:
Switch node
| Field Name | Value |
|---|---|
| Mode | Rules |
Then add the following Routing Rules:
Routing Rules
| Fx | Operator | Value | Rename Output | Output Name |
|---|---|---|---|---|
{{ $json.original_status }} | # is equal to | 200 | Yes | success |
{{ $json.original_status }} | # is not equal to | 200 | Yes | failed |
You can type the expression manually or simply drag the original_status field from the left panel into the value box. n8n will automatically insert the correct expression for you.
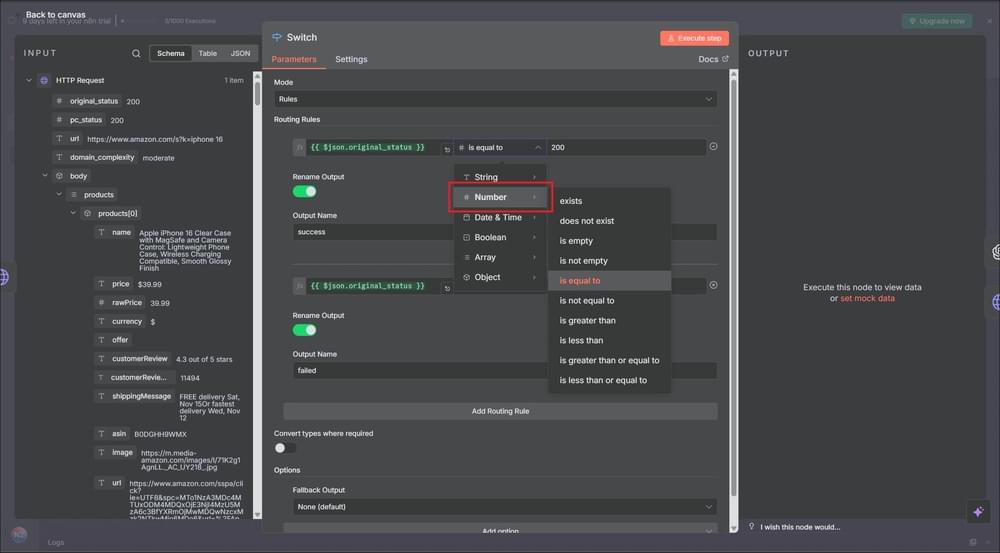
Make sure the type is set to “Number” as this part matters. If it’s left as a string, the comparison may not behave correctly, and the retry logic won’t work as expected.
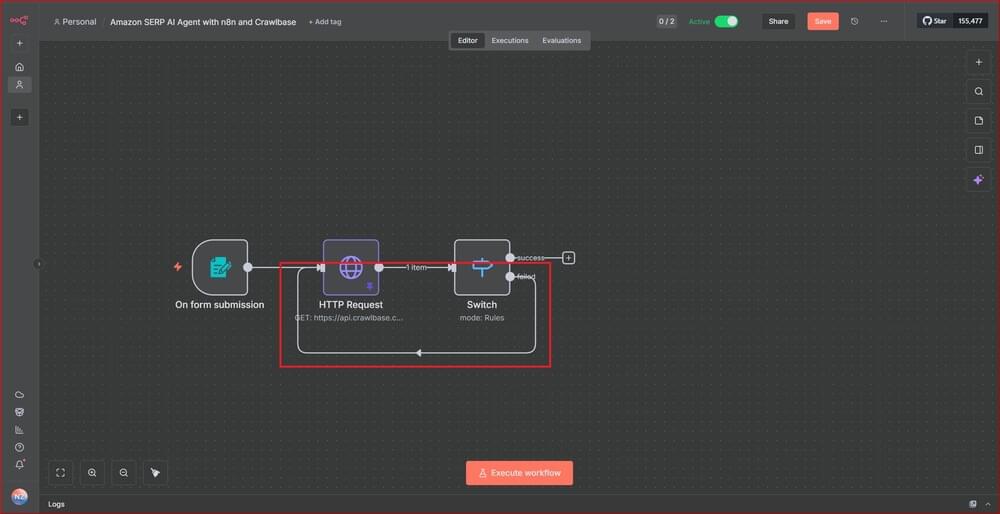
Connect the failed output connector to the start of the HTTP Request node to retry the request on failure.
Step 4: Use AI to Analyze Data
Once the retry loop is in place, we can move on to the AI part. Click the plus (+) button on the success output of the Switch node this time. In the panel on the right, search for OpenAI and select “Message a model”.
This node will take the product data returned by Crawlbase and pass it to your AI model (ChatGPT or whichever model you choose). The AI will then summarize trends, highlight price ranges, common brands, review averages, or whatever insights you want it to extract.
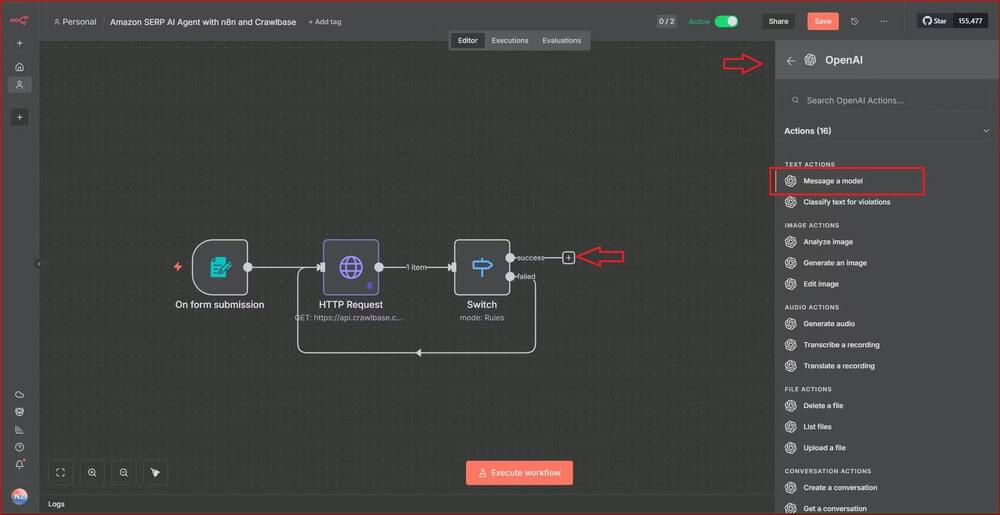
Note: If you haven’t set up your OpenAI credentials yet, you’ll need to do that first. Keep in mind that this feature only works with a paid OpenAI account.
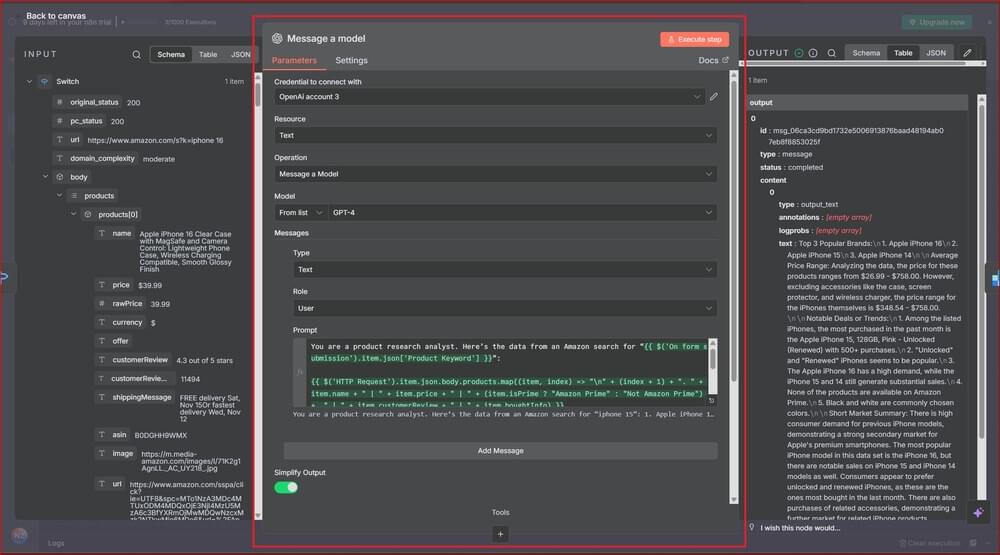
Now configure the OpenAI node with the following settings:
OpenAI node
| Field Name | Value |
|---|---|
| Credential to connect with | <your-configured-open-api-key> |
| Resource | Text |
| Operation | Message a Model |
| Model | GPT-4 |
In the Messages area of the OpenAI node, set the Type value to Text and the Role to User. Then paste the following prompt into the Prompt box:
1 | You are a product research analyst. Here’s the data from an Amazon search for “{{ $('On form submission').item.json['Product Keyword'] }}”: |
Step 5: Send Results via Email
Now that the AI has generated the summary, the last step is delivering it to your inbox. Click the plus (+) button after the OpenAI node and search for “SendGrid” in the right panel, then under Mail Actions, choose “Send an email”.
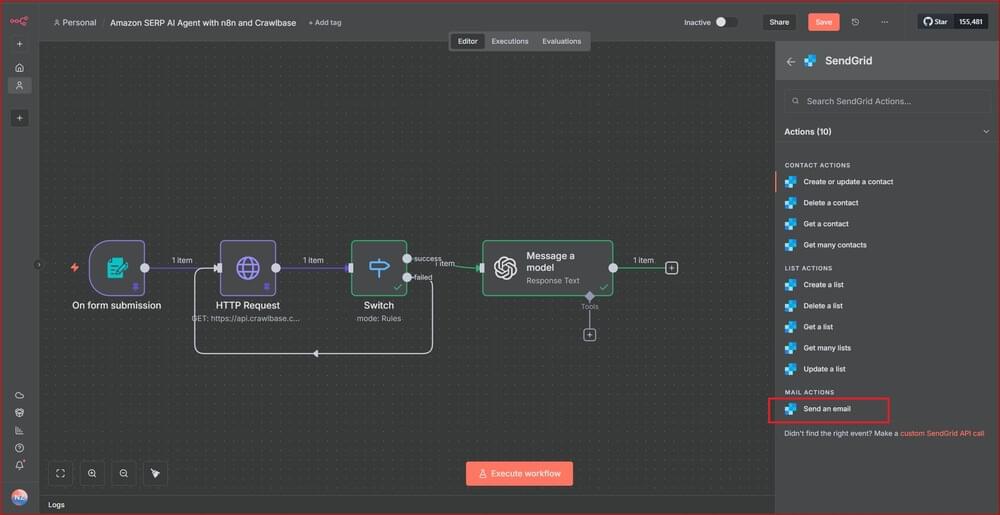
This node will take care of sending the email to the address the user entered in the form, with the AI’s summary included in the message body. Just make sure your SendGrid credentials are set up so n8n can send the message without any issues.
Then fill out the SendGrid node form as follows:
SendGrid Parameters
| Field Name | Value |
|---|---|
| Credential to connect with | <your-configured-sendgrid-api-key> |
| Resource | |
| Operation | Send |
| Sender Email | <same-sender-email-you-configured-in-sendgrid> |
| Sender Name | {{ $('On form submission').item.json['Your Name'] }} |
| Recipient Email | {{ $('On form submission').item.json.Email }} |
| Subject | Amazon Listing Analysis for '{{ $('On form submission').item.json['Product Keyword'] }}' |
| Mime Type | Plain Text |
| Message Body | {{ $json.output[0].content[0].text }} |
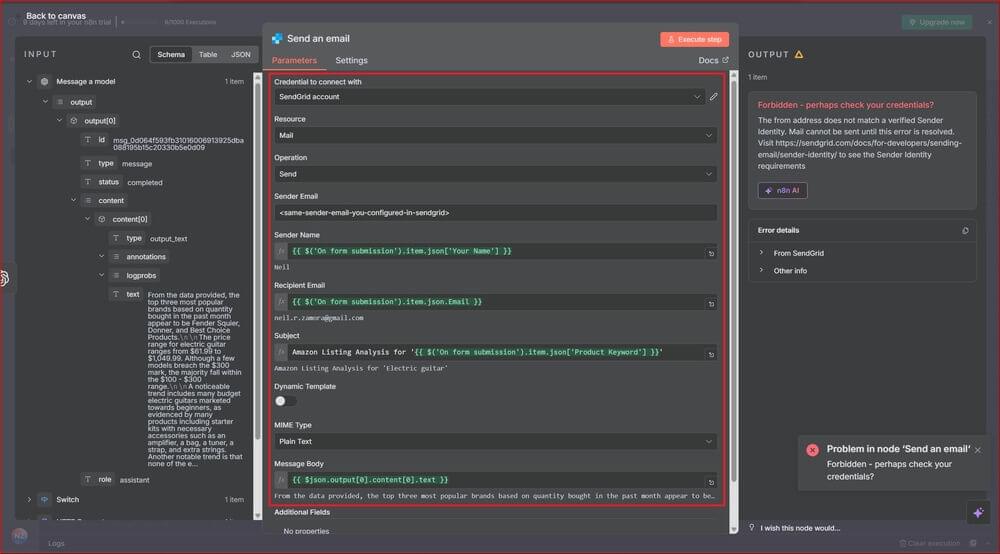
Once everything’s hooked up, the workflow comes together pretty cleanly. The form collects the keyword, Crawlbase fetches the data, the Switch handles retries, the AI summarizes it, and SendGrid sends it out. It should look like this:
Testing the Workflow
Go ahead and activate your workflow in n8n. Once it’s live, open the Production URL from the On form submission node. You should see a simple form like this, ready for testing.
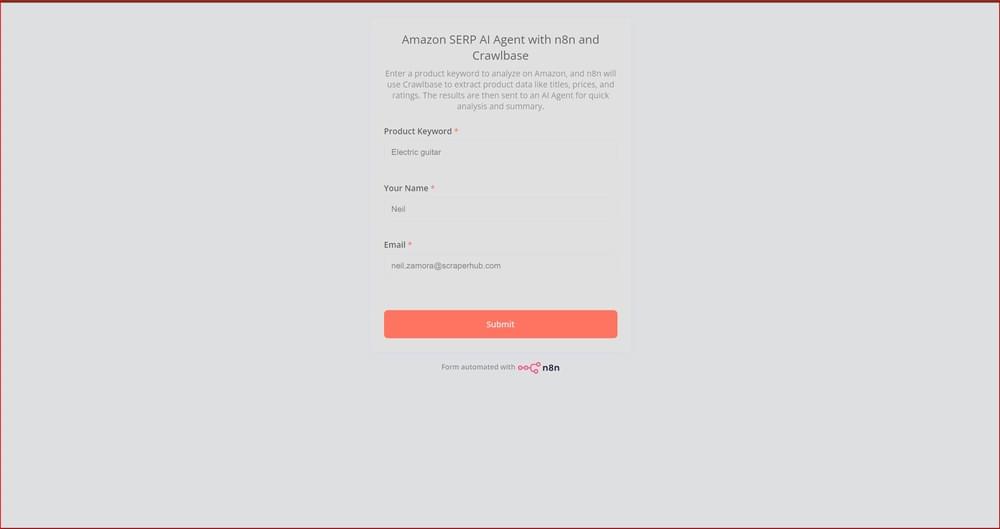
Fill in the form with your details, hit Submit, and give it a moment. Within a few seconds, you should receive an email with the AI summary based on your Amazon search keyword. It’s a quick way to see the whole workflow in action.

Final Thoughts
You’ve just built an AI product research assistant that runs on autopilot.
What you do with it from here is up to you. Track competitor pricing. Monitor stock levels. Send the data to a dashboard instead of your inbox. The framework works the same way. And Crawlbase isn’t just for Amazon; It can scrape most public sites, so you can use this same approach for other platforms.
If you want to keep building, sign up for Crawlbase and see what else you can automate.


